StarTech.com
Ikke kategoriseret
CMDUCT2U2
StarTech.com CMDUCT2U2 Brugsanvisning
Her er StarTech.com CMDUCT2U2 (Ikke kategoriseret) brugervejledning. 2 sider på sprog med en vægt på 347,065.0 Mb. Hvis du ikke kan finde svar på dit problem Spørg vores community.
Side 1/2
Quick-Start Guide
To view manuals, FAQs, videos, drivers, downloads, technical drawings, and more, visit www.startech.com/support
Manual Revision: June 22, 2022 4:16 PM
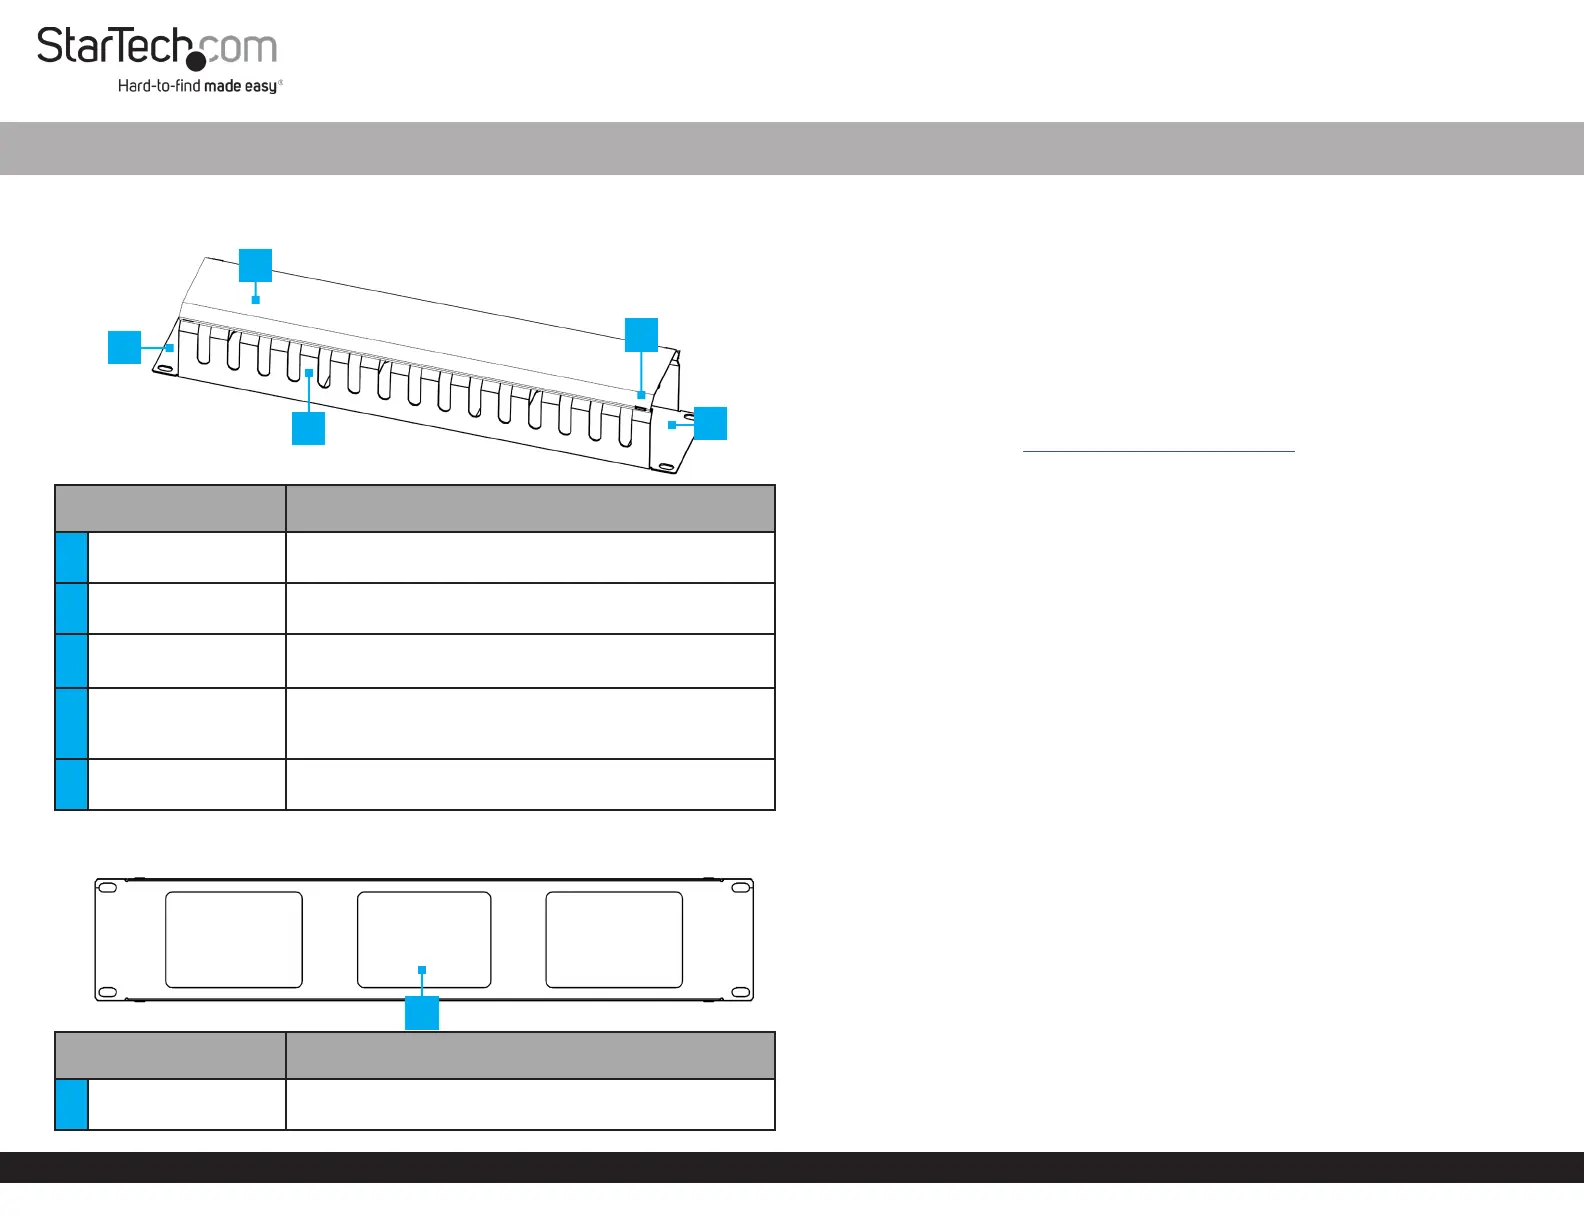
Product Diagram (CMDUCT2U2)
Front View
Component Function
1 Mounting Ears
• Secures the Duct Cable Management Panel to the
rack
2 Duct Cover
• Keeps cables out of the way, and it can be removed for
installation or upgrades
3
Cable Management
Fingers
• Allows cables to be inserted and held in place
• Available along the length on both sides
4 Duct Cover Latches
• Each corner of the Duct Cable Management Panel
has a latching mechanism that keeps the Duct Cover
in place
5 Cable Path
• Allow the inserted cables to run o to the side of the
Duct Cable Management Panel
Rear View
Component Function
1 Pass-through Holes
• Insert the cables through the Pass-through Holes as
needed
2U Horizontal Finger Duct Cable Management Panel for Racks - Includes Cover
Package Contents
• Horizontal Cable Duct x 1
• M6x12 mm Screws x 4
• M6 Cage Nuts x 4
• M6 Plastic Washers x 4
• Quick-Start Guide x 1
Requirements
For the latest manuals, product information, technical specications, and declarations of
conformance, please visit: www.startech.com/CMDUCT2U2
• Phillips head screwdriver
• Cage nut tool (Optional)
Installation
1. Determine the U Height Number or Mounting Location on the Posts of the rack
where to install the Duct Cable Management Panel.
2. Install the M6 Square Cage Nuts (x 4) onto the Square Cage Nut Holes on the
chosen U Height Number. Use a Cage Nut Tool if available or your preferred
installation method.
3. Align the Mounting Ears with the previously inserted M6 Square Cage Nuts on the
rack posts.
4. Insert the M6 Plastic Washers (x 4) onto the M6x12 mm Screws (x 4). Use a Phillips
Head Screwdriver to install the M6x12 Screws (x 4) and fasten the Duct Cable
Management Panel to the Mounting Posts of the rack.
Operation
1. Insert the cables through the Cable Management Fingers and the Pass-through
Holes at the rear. Organize as desired.
2. Latch and secure the Duct Cover using the Duct Cover Latches (x 4).
1
5
4
3
1
2
Problemløsning StarTech.com CMDUCT2U2
Hvis du har læst manualen omhyggeligt, men ikke fundet en løsning på dit problem, bed andre brugere om hjælp
Specifikationer
| Type: | Kabelbakkepanel |
| Bredde: | 72 mm |
| Dybde: | 483 mm |
| Højde: | 88 mm |
| Antal pr. pakke: | 1 stk |
| Produktfarve: | Sort |
| Pakkevægt: | 1500 g |
| Pakkedybde: | 150 mm |
| Pakkebredde: | 545 mm |
| Pakkehøjde: | 145 mm |
| Husmateriale: | Plastic, Steel |
| Hurtig installationsvejledning: | Ja |
| Bæredygtighedscertifikater: | CE, RoHS |
| Hovedkassen højde (udvendigt): | 640 mm |
| Hovedkassens længde (udvendigt): | 640 mm |
| Hovedkassens bredde (udvendigt): | 565 mm |
| Produkter pr. hovedkasse (udvendigt): | 16 stk |
| Overholdelse af bæredygtighed: | Ja |
| Overholdelse af branchestandarder: | EIA RS310-D |
| Skruer inkluderet: | Ja |
| Rackkapacitet: | 2U |
| Antal skruer: | 4 |
| Skruetype: | M6x12 |
| Spændeskiver inkluderet: | Ja |
| Burmøtrikker inkluderet: | Ja |
| Antal burmøtrikker: | 4 |
| Antal spændeskiver inkluderet: | 4 |