Sony
Ikke kategoriseret
VCT-PG11RMB
Sony VCT-PG11RMB Brugsanvisning
Her er Sony VCT-PG11RMB (Ikke kategoriseret) brugervejledning. 2 sider på sprog med en vægt på 3,177,016.0 Mb. Hvis du ikke kan finde svar på dit problem Spørg vores community.
Side 1/2
リモコン三脚
Remote control Tripod
Trépied à télécommande
2-659-234- (1)02
取扱説明書
Operating Instructions
Mode d’emploi
Manual de instrucciones
Bedienungsanleitung
VCT-PG11RMB
©2005 Sony Corporation Printed in Japan
A
2
7
9
8
24
B
1
3
4
6
5
4
2
10
11
12
13
1
22
26
14
15
16
17
18
19
20
28
29
3
23
1
1
2
3
2
4
5
D
E
F
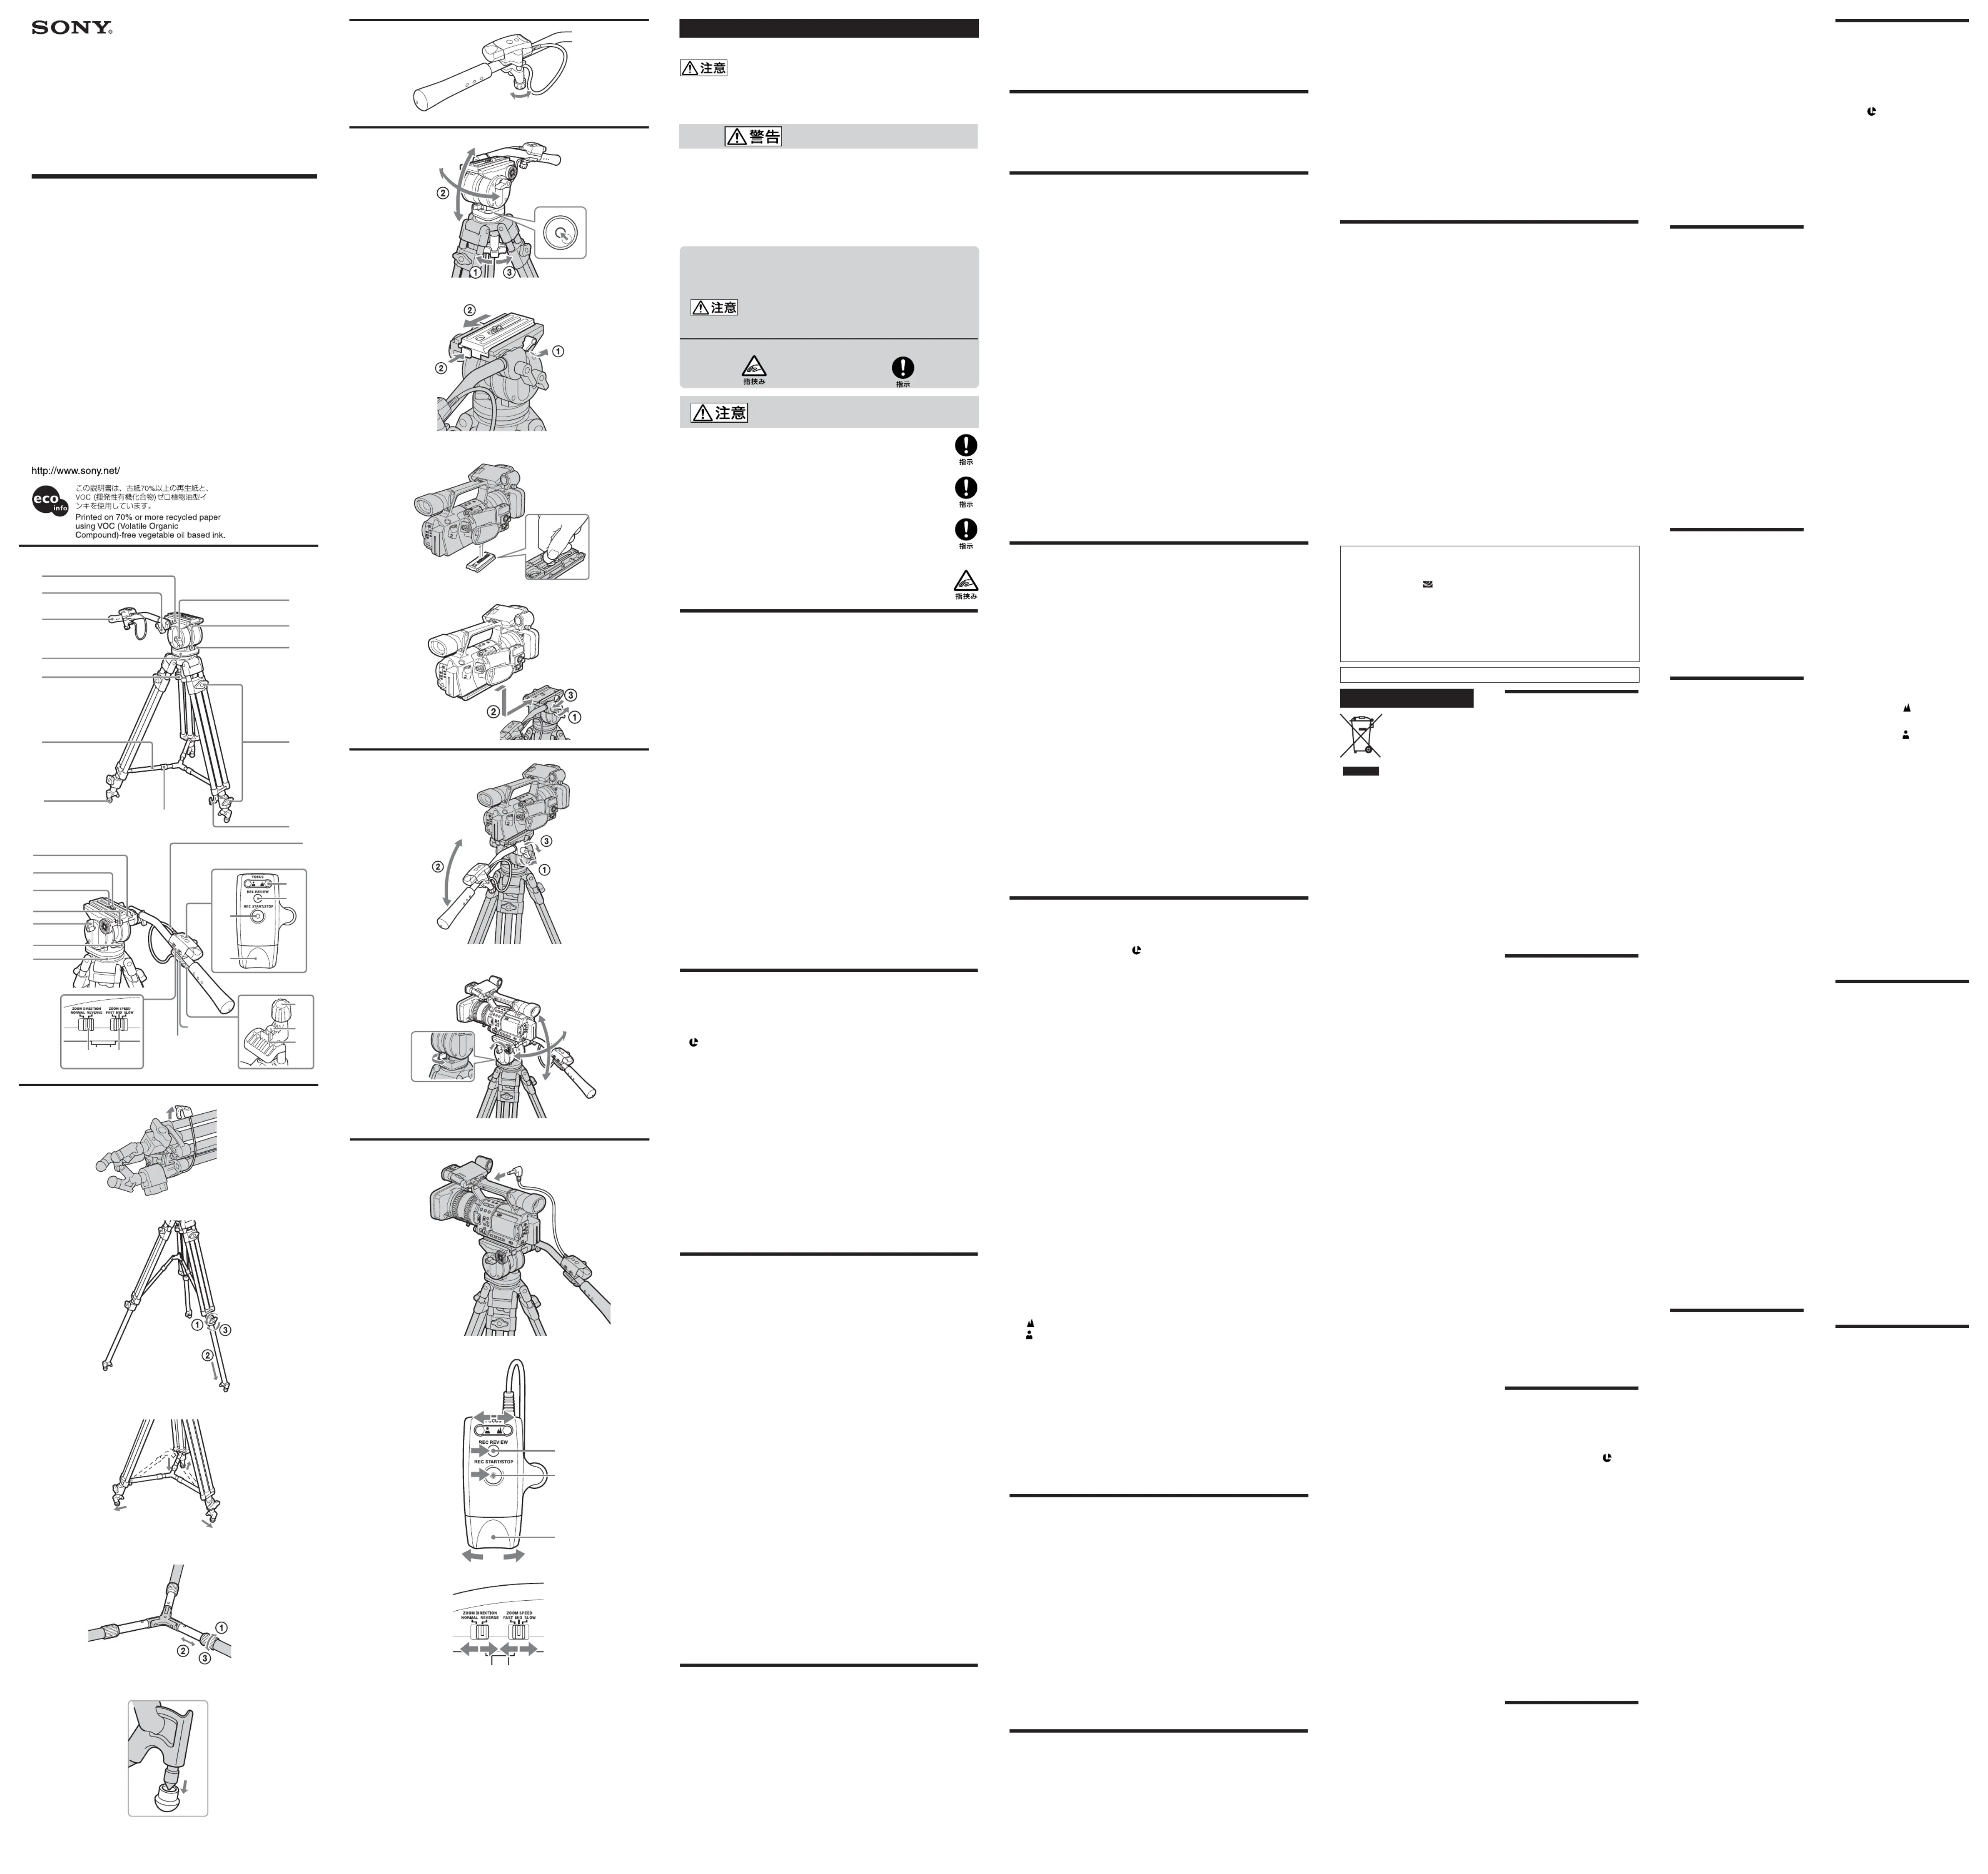
日本語
お買い上げいただきありがとうございます。
電気製品は安全のための注意事項を守らないと、火災や人身事故にな
ることがあります。
この取扱説明書には、事故を防ぐための重要な注意事項と製品の取り扱いかたを示し
ています。 製品を安全にお使いください。お読この取扱説明書をよくお読みのうえ、
みになったあとは、いつでも見られるところに必ず保管してください。
ソニー製品は安全に充分配慮して設計されています。しかし、まちがった
使いかたをすると、火災などにより人身事故になることがあり危険です。
事故を防ぐために次のことを必ずお守りください。
●安全のための注意事項を守る
●故障したら使わない
ご購入いただいた特約店、またはソニー業務用商品に関するお問い合わ
せ窓口にご相談ください。
安全のために
警告表示の意味
取扱説明書では、次のような表示をしています。表示の内容をよく理解
してから本文をお読みください。
この表示の注意事項を守らないと、感電やその他の事故
によりけがをしたり周辺の家財に損害を与えたりするこ
とがあります。
注意を促す記号 行為を指示する記号
下記の注意事項を守らないと、
けがをすることがあり
ます。
開脚してからビデオカメラを取り付ける
脚を閉じたまま取り付けると、転倒してビデオカメラを破損したり
けがの原因となることがあります。
積載ビデオカメラ重量を守る
制限重量を超えると、三脚が倒れたりしてけがの原因となることが
あります。
各ロックつまみやレバーおよび脚ロックレバー、カメラネジなどの
締めつけパーツは確実に締めつけて固定する
締めつけが弱いと、ずれたりはずれたりして、ビデオカメラの破損
や人にけがを負わせる原因となることがあります。
脚の出し入れには充分注意をはらう
指などをはさみ、思わぬけがをすることがあります。
使用上のご注意
リモコンについて
•
落としたり、液体がかかったりしないようにていねいに扱ってくださ
い。
•
直射日光の当たるところや暖房器具のそばなど温度の高いところや、湿
気の多いところには置かないでください。
•
リモートプラグは、まっすぐに抜き差ししてください。無理に抜き差し
をすると破損の恐れがあります。
•
必要以上に強くクランプを締め付けないでください。破損の原因になり
ます。
ビデオカメラを取り付け、取りはずすには
必ずティルトストッパーを確実にしめて固定してください。また、雲台に
ビデオカメラを搭載後にアクセサリーなどを取り付けないでください。雲
台が傾き、ビデオカメラを破損することがあります。
持ち運びについて
使い終わったら、 ビデオカメラをはずし、 脚を収納し、 リモコンに1 2 3
無理な力が加わらないように注意して、パンハンドルをたたんでくださ
い。
ビデオカメラを取り付けたままで、持ち歩かないでください。
お手入れについて
•
汚れたら、やわらかい布に中性洗剤溶液を含ませてふいてから、乾いた
布でからぶきしてください。
•
海岸など、潮風の当たる所で使用した後は、乾いた布でよくふいてくだ
さい。
ステーについて
ステーを取りはずした状態では使用しないでください。
特長
この三脚は、ビデオカメラなどにお使いいただける、リモコン機能付き三
脚です。
リモコンについて
• LANC
端子搭載のビデオカメラに接続できます。
•
クランプを使い、三脚のパンハンドルに取り付けて操作することができ
ます。
•
ズーム方向切り換えスイッチにより、ズームレバーのズーム方向を切り
換えることができます。
•
ズームスピード切り換えスイッチにより、ズームスピードを
3
段階に切
り換えることができます。
三脚について
•
ボールレベラー方式ですので、正確な水平出しがすばやくできます。
•
油圧式パンハンドルですので、パンニング/ティルティングを滑らかに
行えます。
•
カウンターバランス機能により、ティルト角に合わせて安定したバラン
スを自動調整します。
•
ワンタッチスライド式プレートですので、重心のかたよりのないバラン
スを容易にとることができます。
•
伸縮可能タイプのステーですので、傾斜地などでも脚の傾きや幅を自在
調節できます。
A各部のなまえ
1プレートロックレバー
2パンハンドル固定ネジ
3パンハンドル
4雲台
5ボールレベルロックノブ
6ステー
7スパイク(ゴムカバーの中)
8ステーロックネジ
9ティルトトルク切り換えレバー
10 パンストッパー
11 水準器
12 脚ロックレバー
13 脚ホルダー
14 カメラプレート
15 カメラネジ
16 ビデオボス
17 プレート着脱ボタン
18 ティルトストッパー
19 パントルク切り換えレバー
20 ボールレベル
21 リモートコード
22
FOCUS
ボタン
23
REC REVIEW
ボタン
24
REC START/STOP
ボタン
25 ズームレバー
26 ズーム方向切り換えスイッチ
27 ズームスピード切り換えスイッチ
28 リモートプラグ
29 クランプ
30 クランプツマミ
31 リモートプラグホルダー
32 リモートコードホルダー
B三脚を立てる
1脚ホルダーをはずす
脚ホルダーのロープは自動的に脚の中に入ります。
2脚を任意の長さに調整して、固定する
はじめは、上側の脚ロックレバーをゆるめて脚を引き出し、固定しま
す。
高さが足りないとき、下側の脚を引き出します。
1脚ロックレバーをゆるめる。
2脚を引き出す。
3脚ロックレバーをまわして「
LOCK
」の位置にあわせる。
3脚を広げ、ステーを押し下げる
ステーに無理な力を加えないようにしてください。破損する恐れがあ
ります。
4ステーの長さを調節する
1ステーロックネジをゆるめる。
ソニー株式会社 〒
108-0075
東京都港区港南
1-7-1
【ソニー業務用商品に関するお問い合わせ窓口】
≪電話≫
ソニー業務用商品お客様ご相談センター
ナビダイヤル
0570-00-2288
(全国どこからでも市内通話料金でご利用いただけます)
携帯電話、
PHS
でのご利用は
0466-31-2588
<
FAX
>
0466-31-2595
受付時間 <月〜金>
9:00
〜
18:00
(土・日・祝日及び年末年始は除く)
≪ホームページ≫
ソニードライブ
http://www.sony.jp/
English
Disposal of Waste
Electrical and
Electronic Equipment
for business use
(Applicable in the
European Union and
other European
countries with
separate collection
systems)
This symbol on the product or on
its packaging indicates that this
product shall not be treated as
household waste. Instead it shall be
handed over to the applicable take-
back scheme for the recycling of
electrical and electronic equipment.
By ensuring this product is
disposed of correctly, you will help
prevent potential negative
consequences for the environment
and human health, which could
otherwise be caused by
inappropriate waste handling of
this product. The recycling of
materials will help to conserve
natural resources. For more
detailed information about
recycling of this product, please
contact your local Sony office or
visit Sony Europe’s web site for
business customers:
http://www.sonybiz.net/
environment
For the customers in Europe
This product with the CE marking
complies with the EMC Directive
(89/336/EEC) issued by the
Commission of the European
Community.
Compliance with this directive
implies conformity to the following
European standards:
• EN55103-1: Electromagnetic
Interference (Emission)
• EN55103-2: Electromagnetic
Susceptibility (Immunity)
This product is intended for use in
the following Electromagnetic
Environment(s): E1 (residential), E2
(commercial and light industrial),
E3 (urban outdoors), and E4
(controlled EMC environment, ex.
TV studio).
For the customers in the
U.S.A.
THIS DEVICE COMPLIES WITH
PART 15 OF THE FCC RULES.
OPERATION IS SUBJECT TO THE
FOLLOWING TWO CONDITIONS:
(1) THIS DEVICE MAY NOT
CAUSE HARMFUL
INTERFERENCE, AND
(2) THIS DEVICE MUST ACCEPT
ANY INTERFERENCE
RECEIVED, INCLUDING
INTERFERENCE THAT MAY
CAUSE UNDESIRED
OPERATION.
CAUTION
You are cautioned that any changes
or modifications not expressly
approved in this manual could void
your authority to operate this
equipment.
Note:
This equipment has been tested and
found to comply with the limits for
a Class B digital device, pursuant to
Part 15 of the FCC Rules. These
limits are designed to provide
reasonable protection against
harmful interference in a residential
installation. This equipment
generates, uses, and can radiate
radio frequency energy and, if not
installed and used in accordance
with the instructions, may cause
harmful interference to radio
communications. However, there is
no guarantee that interference will
not occur in a particular
installation. If this equipment does
cause harmful interference to radio
or television reception, which can
be determined by turning the
equipment off and on, the user is
encouraged to try to correct the
interference by one or more of the
following measures:
– Reorient or relocate the receiving
antenna.
– Increase the separation between
the equipment and receiver.
– Connect the equipment into an
outlet on a circuit different from
that to which the receiver is
connected.
– Consult the dealer or an
experienced radio/TV technician
for help.
For the customers in Canada
This Class B digital apparatus
complies with Canadian ICES-003.
Caution
Attach the video camera
after opening the legs
Attaching the video camera before
opening the legs may cause the
tripod to fall damaging the video
camera or injuring yourself and
others.
Observe the load limit
Exceeding the load limit may cause
the tripod to fall and cause injury.
Tighten the lock parts (lock
knob, lever, leg lock lever
and camera mounting screw
etc.) firmly
Failure to properly tighten them
may cause parts to shift position or
come loose damaging the video
camera or injuring yourself and
others.
Take care when opening and
closing the legs
Otherwise you might pinch your
fingers or suffer other unforeseen
injuries.
Notes on use
Remote commander
• Be sure not to drop the Remote
Commander or spill liquid on it.
• Do not leave the Remote
Commander in direct sunlight,
near heaters, or in locations with
high humidity.
• When inserting or pulling the
Remote plug, be sure to do so in a
straight line. Performing this
operation forcibly may damage
either the remote plug or the unit
connected.
• Do not overly tighten the cramp.
Doing so may cause damage.
Attaching and removing the
video camera
Tighten and lock the tilt lock lever
firmly. Do not attach accessories to
the tripod head after mounting the
video camera on the mounting
head as this may cause the tripod
head to incline and damage the
video camera.
Carrying the tripod
After using the tripod, 1 remove
the video camera, 2 close the legs,
and 3 fold away the pan handle
taking care not to apply any excess
force to the Remote Commander.
Never carry the tripod with the
video camera attached.
Cleaning
• Clean the tripod with a soft cloth
lightly moistened with a mild
detergent solution.
• After using the tripod at a
location subject to sea breezes, be
sure to wipe it clean with a dry
cloth.
Stay
Do not use the tripod without
attaching the stay.
Features
The VCT-PG11RMB is a remote
control tripod for video camera.
Remote commander
• The RM-1BP Remote Commander
can be connected to a Sony video
camera equipped with a LANC
terminal.
• It can be operated by attaching it
to the pan handle on the tripod
using the cramp provided.
• The zoom direction of the zoom
lever can be switched using the
ZOOM DIRECTION change over
switch.
• The zoom speed can be switched
to one of three levels using the
ZOOM SPEED change over
switch.
Tripod
• A ball-level for quick and easy
level adjustment.
• The oil-cylinder pan handle
permits smooth panning and
tilting.
• Use the counterbalance function
to automatically adjust stable
balance depending on tilt angle.
• The one-touch slide plate
provides proper balance easily.
• The stays for flexible adjustment
of leg width and inclination even
on sloping ground.
AIdentifying the
Parts
1Plate lock lever
2Pan handle lock lever
3Pan handle
4Tripod head
5Ball level lock knob
6Stay
7Spike (Rubber guard)
8Stay lock screw
9Tilt torque changeover lever
10 Pan lock lever
11 Level
12 Leg lock lever
13 Leg holder
14 Camera plate
15 Camera mouonting screw
16 Pin
17 Plate detaching button
18 Tilt lock lever
19 Pan torque changeover lever
20 Ball level
21 Remote cord
22 FOCUS button
23 REC REVIEW button
24 REC START/STOP button
25 Zoom lever
26 ZOOM DIRECTION change
over switch
27 ZOOM SPEED change over
switch
28 Remote plug
29 Cramp
30 Cramp knob
31 Remote plug holder
32 Remote cord holder
BSetting up the
Tripod
1Remove the leg holder.
The leg holder cord
automatically returns back
inside the leg.
2Adjust and lock the length
of the legs.
Do with the upper leg lock
levers first, then the lower ones.
1Loosen the leg lock lever.
2Adjust the length of the leg.
3Tighten the leg lock lever to
LOCK position.
3Spread the tripod legs
outward and push down
the stay.
If unnecessary force is exerted
on the stay, it may be damaged.
4Adjust the length of the
stays.
1Loosen the stay lock screws.
2Adjust the length of the
stays
3Tighten the stay lock screws.
To use the spike
Remove the rubber guard from the
spike.
If the spike may damage the floor,
do not use it.
CAttaching the
Remote
Commander
1Rotate the cramp knob on
the Remote Commander
counterclockwise as far as
required to insert the pan
handle.
2Align the center of the pan
handle with the V groove
on the cramp, and rotate
the cramp knob clockwise
to lock it firmly.
DMounting the
Video Camera
• The weight of the video camera
that you can attach is less than 5
kg.
Do not attach the video camera
that exceeds the weight
restriction.
• The HDR-FX1/HVR-Z1 can be
attached to the camera plate with
the VCT-FXA (shoulder brace).
Preparation before
attaching the video
camera
1Install the battery pack and
a cassette in the video
camera.
2To make the camera level.
1Unlock the ball level lock
knob.
2Adjust the angle of the
tripod head so that the
bubble in the level moves
inside the black ring.
3Lock the ball level lock
knob.
3Detach the camera plate of
the tripod.
1Loosen the plate lock lever.
2Pull the camera plate out
while pressing the plate
detaching button.
Mounting the video
camera
4Align the pin and the
camera mounting screw on
the camera plate with the
holes on the bottom of the
video camera, and tighten
the camera mounting screw
firmly. After attaching,
make sure that the video
camera is securely fastened
to the camera plate.
5Mount the video camera on
the tripod.
1Make sure that the plate lock
lever is loose.
2Slide the camera plate while
pressing the plate detaching
button until it clicks, then
make sure that the video
camera is securely fastened
to the camera plate.
3Lock the plate lock lever.
Notes
• When the video camera is
attached, be sure not to touch the
leg lock lever on the tripod.
• Do not tilt the video camera while
the plate lock lever is loose. If you
do so, the video camera may fall
off the tripod.
EPanning and
Tilting
1Adjusting the position of
the pan handle
1 Loosen the pan handle lock
lever.
2 Adjust the position of the
pan handle.
3 Tighten and lock the pan
handle lock lever.
2Using the pan handle with
a reverse grip
1Loosen the pan handle lock
lever.
2Turn the pan handle to a
reverse grip position.
3Tighten and lock the pan
handle lock lever.
3To attach the pan handle to
the left side
Attach the pan handle in a
position that enables the tilt
lock lever to lock.
Rotate the pan handle
attachment plate before
attaching.
4Panning
Loosen the pan lock lever and
adjust the position of the video
camera by moving the pan
handle, then tighten the pan
lock lever.
5Tilting
Loosen the tilt lock lever and
adjust the position of the video
camera by moving the pan
handle, then tighten the tilt lock
lever.
Changing the panning/
tilting torque
There are two panning/tilting
torque positions (weak (-) and
strong (+)). Change to suit
recording needs.
Notes
• Do not use the pan lock lever or
tilt lock lever to adjust panning or
tilting resistance. Doing so may
cause damage.
• Be sure to loosen the lock lever
before panning or tilting the video
camera.
2長さを調節する。
3ステーロックネジを締めて、固定する。
スパイクを使うには
スパイクのゴムカバーをはずします。
床に傷をつける恐れのある場合は使わないでください。
Cリモコンを取り付ける
1リモコンのクランプツマミを反時計まわりにまわし、パンハンドルを
はさめる位置までゆるめます。
2三脚のパンハンドルの中心をクランプのV溝に合わせ、クランプツマ
ミを時計まわりにまわして確実に固定します。
Dビデオカメラを取り付ける
•
取り付けられるビデオカメラの重量は
5 kg
以下です。
制限重量を超えるビデオカメラは取り付けないでください。
• HDR-FX1/HVR-Z1
に
VCT-FXA
(ショルダーブレース)を取り付けた状
態でカメラプレートを取り付けることができます。
取り付ける前の準備
1ビデオカメラにバッテリーやカセットをセットする
2水平の調整をする
1ボールレベルロックノブをゆるめる。
2水準器の中の気泡が黒い円に入るように、雲台の角度を調整する。
3ボールレベルロックノブを締める。
3三脚のカメラプレートをとりはずす
1プレートロックレバーをゆるめる。
2プレート着脱ボタンを押しながらカメラプレートを抜き取る。
ビデオカメラを取り付ける
4カメラプレートのビデオボスとカメラネジを、それぞれビデオカメラ
の穴に合わせカメラネジをしっかりと締め、がたつきがないことを確
認する
5ビデオカメラを三脚に取り付ける
1プレートロックレバーがゆるんでいることを確認する。
2プレート着脱ボタンを押しながら「カチッ」と音がするまで差し込
み、手前に抜けないことを確認する。
3プレートロックレバーを固定する。
ご注意
•
ビデオカメラを取り付けた状態では、脚ロックレバーに触れないように
注意してください。
•
プレートロックレバーをゆるめた状態で、ティルティングは行なわない
でください。ビデオカメラが落ちることがあります。
Eパンニング/ティルティング
1パンハンドルの位置を調整する
1パンハンドル固定ネジをゆるめる。
2使いやすい位置にする。
3パンハンドル固定ネジを締めて、固定する。
2逆手で使用する場合
1パンハンドル固定ネジをゆるめる。
2パンハンドルを逆手で使用できる位置にする。
3パンハンドル固定ネジを締めて、固定する。
3左側にパンハンドルを取り付けるには
ティルトストッパーが固定できる位置で取り付けてください。
パンハンドル固定ネジをゆるめ取りはずし、取り付け部分を回転させ
て取り付ける。
4パンニング
パンストッパーをゆるめ、パンハンドルを左右方向の任意の位置に動
かし、パンストッパーを締めて固定します。
5ティルティング
ティルトストッパーをゆるめ、パンハンドルを上下方向の任意の位置
に動かし、ティルトストッパーを締めて固定します。
パンニング/ティルティングのトルク切り換え
パンニングおよびティルティングのトルクは、弱(−)と強(+)の
2
段階
ありますので、撮影に応じて切り換えを行なってください。
ご注意
•
パンストッパーやティルトストッパーをトルクの重さ調節には絶対に使
用しないでください。故障の原因となります。
•
確実にストッパーをゆるめてから、パンニング/ティルティングをして
ください。
Fリモコンで操作する
お手持ちのビデオカメラの取扱説明書も合わせてお読みください。
1ビデオカメラの電源が
OFF
になっていることを確かめてから、リモー
トプラグをビデオカメラの
LANC
(リモート)端子に対してまっす
ぐにして挿入する
2ビデオカメラを撮影状態にする
詳しくはお使いになる機器の取扱説明書をご覧ください。
3
REC START/STOP
ボタンを押す。
撮影が始まります。もう一度を押すと、撮影が止まります。(スタン
バイ状態)
4ズームする
1ズーム方向切り換えスイッチでズーム方向を選択します。
2本機のズームレバーをまわします。
NORMAL
モード
時計まわり テレ側(望遠) :被写体が大きく写ります。
反時計まわり ワイド側(広角) :被写体が小さく写ります。
REVERSE
モード
時計まわり ワイド側(広角) :被写体が小さく写ります。
反時計まわり テレ側(望遠) :被写体が大きく写ります。
お手持ちの機器の種類によっては、ズームスピード切り換えスイッチ
と、ズームレバーをまわす量によって、早くズームさせることができ
ます。
SLOW
モード
ズームレバーをまわす量にかかわりなく一番遅いスピードでズーム
します。
MID
モード
ズームレバーをまわす量に応じて、早くズームします。(
4
段階)
FAST
モード
ズームレバーをまわす量に応じて、より早くズームします。(
8
段
階)
5手動でピントを合わせる
ビデオカメラのフォーカススイッチを「手動」に切り換え、
FOCUS
ボタンを押します。
側に押す:ピントを奥の被写体に送ります。
側に押す:ピントを手前の被写体に送ります。
6テープを停止した場面を確認する
スタンバイ状態のときに、
REC REVIEW
ボタンを押します。
最後にテープを停止させた部分が、ビデオカメラの液晶画面に数秒間
再生され、その後スタンバイ状態に戻ります。
ご注意
•
本機を使って、静止画を撮影することはできません。
•
同じテープに
HDV
規格と
DV
規格を混在させたときに
REC REVIEW
ボ
タンを押しても画面が出ないことがありますが、故障ではありません。
ご使用にならないとき
リモートプラグは、リモートプラグホルダーに差し込んでおいてくださ
い。
G三脚をたたむ
1ビデオカメラをはずす
2付属のキャリングケースの内側にある保護カバーを取りはずし、リモ
コンにかぶせ面ファスナーで固定する
3パンハンドル固定ネジをゆるめて、パンハンドルをたたむ
4
3
本の脚の各脚ロックレバーをゆるめる
5脚ロックレバーをしっかりしめて固定する
ステーの長さを
3
本とも同じ長さにする
長さがちがうままたたむと、脚を破損することがあります。
6ステーをたたんで脚を閉じてから、最後の脚を閉じる
7脚ホルダーで脚を固定する
1フック部分を引いて脚ホルダーを引き出す。
2
3
本の脚をまとめて留める。
ご注意
•
パンハンドルをたたむとき、リモコンに無理な力が加わらないようにし
てください。
•
付属のキャリングケースに収納するとき、リモコンに無理な力が加わら
ないようにしてください。
主な仕様
三脚
積載ビデオカメラ重量
5 kg
以下
パンニング角
360
度
ティルティング角前傾、後傾
90
度
外形寸法全高 約
1,490 mm
縮長 開脚時 約
705 mm
閉脚時 約
820 mm
パンハンドルの長さ 約
380 mm
質量 約
4.7 kg
脚段数
3
段
リモコン(
RM-1BP
)
リモコン機能
REC START/STOP
ボタン、
FOCUS
ボタン、
REC REVIEW
ボタン、ズームレバー、ズーム方向
切り換えスイッチ、ズームスピード切り換えス
イッチ
外形寸法 約
62
×
80
×
105 mm
(幅/高さ/奥行き)
リモートコード 約
1,000 mm
質量 約
100 g
同梱物 三脚(
1
)、リモコン(
1
)、キャリングケース(
1
)、
印刷物一式
仕様および外観は、改良のため予告なく変更することがあります。
保証書とアフターサービス
保証書
•
この製品には保証書が添付されていますので、お買い上げの際、お受け
取りください。
•
所定事項の記入および記載内容をお確かめのうえ、大切に保存してくだ
さい。
•
保証期間は、お買い上げ日より
1
年間です。
アフターサービス
調子が悪いときはまずチェックを
この取扱説明書をもう一度ご覧になってお調べください。
それでも具合の悪いときは
ご購入いただいた特約店、またはソニー業務用商品に関するお問い合わせ
窓口にご相談ください。
保証期間中の修理は
保証書の記載内容に基づいて修理させていただきます。詳しくは保証書を
ご覧ください。
保証期間経過後の修理は
修理によって機能が維持できる場合は、ご要望により有償修理させていた
だきます。
ご相談になるときは次のことをお知らせください。
•
型名:
VCT-PG11RMB
•
故障の状態:できるだけ詳しく
•
お買い上げ年月日
FUsing the Remote
Commander
Refer to the operating instructions
of the video camera for further
information.
1Be sure the video camera is
turned off, then insert the
remote plug straight into
the LANC terminal.
2Setting the video camera to
record images
Refer to the operating
instructions of the unit used
with the Remote Commander
for further information.
3Press the REC START/STOP
button
Press the REC START/STOP
button to start recording.
Press it again to stop recording.
(Standby mode)
4Using the zoom
1Select the zoom direction
with the ZOOM
DIRECTION change over
switch.
2Rotate the zoom lever of the
Remote Commander.
NORMAL mode
Clockwise
Tele side (for telephoto):
subject appears closer.
Counterclockwise
Wide side (for wide-angle):
subject appears farther
away.
REVERSE mode
Clockwise
Wide side (for wide-angle):
subject appears farther
away.
Counterclockwise
Tele side (for telephoto):
subject appears closer.
Depending on your video
camera, zooming can be
accelerated by using the ZOOM
SPEED change over switch
together with the amount the
zoom lever is rotated.
SLOW mode
In SLOW mode, the video
camera zooms at the slowest
speed, regardless of how
much the zoom lever is
rotated.
MID mode
In MID mode, the video
camera zooms quickly,
depending on how much the
zoom lever is rotated. (4
stages)
FAST mode
In FAST mode, the video
camera zooms even faster,
depending on how much the
zoom lever is rotated. (8
stages)
5Focusing the video camera
manually
Switch the focus switch of the
video camera to “Manual” and
press the FOCUS button on the
Remote Commander.
Press to the side: Video
camera focuses on the subject
at the rear.
Press to the side: Video
camera focuses on the subject
at the front.
6 Reviewing the most
recently recorded scenes
While in standby mode, press
the REC REVIEW button.
The last several seconds of
recorded images before the
tape was stopped will be
played on the LCD screen, and
then the video camera will
return to standby mode.
Notes
• You cannot record still images
with the Remote Commander.
• If HDV standard and DV
standard have been mixed on the
same tape, an image may not
appear on the screen when the
REC REVIEW button is pressed. It
is not malfunction.
When not using the remote
commander
Attach the remote plug into the
remote plug holder.
GFolding the Tripod
1Remove the video camera.
2Remove the protective
cover from inside the
carrying case, and cover the
Remote Commander with
it. Fix it firmly with the
hook and loop fastener.
3Loosen the pan handle lock
lever then fold the pan
handle.
4Loosen the each leg lock
lever of the three legs.
5Tighten the lock levers and
lock the legs.
Adjust the three stays to the
same length.
If the stay lengths are not all
the same, the legs may be
damaged when folding.
6Close the legs and shorten
the last leg.
7Lock the legs with the leg
holder.
1Pull out the leg holder from
the leg.
2Bind the three legs.
Notes
• When folding away the pan
handle, do not apply any excess
force to the Remote Commander.
• When storing away into the
supplied carrying case, do not
apply any excess force to the
Remote Commander.
Specifications
Tripod
Maximum load
5 kg (11 lb 0 oz)
Panning angle
360 degrees
Tilting angle
90 degrees
(upward/downward)
Stages of legs
3 stages
Dimensions
Maximum height:
Approx. 1,490 mm
(58 3/4 inches)
Minimum height:
Approx. 705 mm
(27 7/8 inches) (Legs spread)
Approx. 820 mm
(32 3/8 inches) (Legs closed)
Pan handle length:
Approx. 380 mm (15 inches)
Mass
Approx. 4.7 kg (10 lb 6 oz)
Remote commander (RM-
1BP)
Remote control function
REC START/STOP button,
FOCUS button, REC REVIEW
button, Zoom lever, ZOOM
DIRECTION change over
switch, ZOOM SPEED change
over switch
Dimensions
Approx. 62 105 mm× 80 ×
(w/h/d)
(2 1/2 3 1/4 4 1/4 inches)× ×
Cord length:
Approx. 1,000 mm
(39 3/8 inches)
Mass
Approx. 100 g (3.6 oz)
Included items
Tripod (1)
Remote control (1)
Carrying case (1)
Set of printed documentation
Design and specifications are
subject to change without notice.
25
27
30
C
5
5
4
4
5
6
3
4 2
4 1
2
1
31
32
21
Problemløsning Sony VCT-PG11RMB
Hvis du har læst manualen omhyggeligt, men ikke fundet en løsning på dit problem, bed andre brugere om hjælp
Specifikationer
| Vægt: | 4700 g |
| Produktfarve: | Sort |
| Formål: | Håndholdte videokameraer |
| Antal ben: | 3 ben |
| Højde (min.): | 820 mm |
| Højde (maks.): | 1490 mm |
| Maksimal vægtkapacitet: | 5 kg |