StarTech.com
Vægophæng
CPUMNTUD
StarTech.com CPUMNTUD Brugsanvisning
Her er StarTech.com CPUMNTUD (Vægophæng) brugervejledning. 2 sider på sprog Engelsk med en vægt på 0.2 Mb. Hvis du ikke kan finde svar på dit problem Spørg vores community.
Side 1/2
Quick-Start Guide
To view manuals, FAQs, videos, drivers, downloads, technical drawings, and more, visit www.startech.com/support.
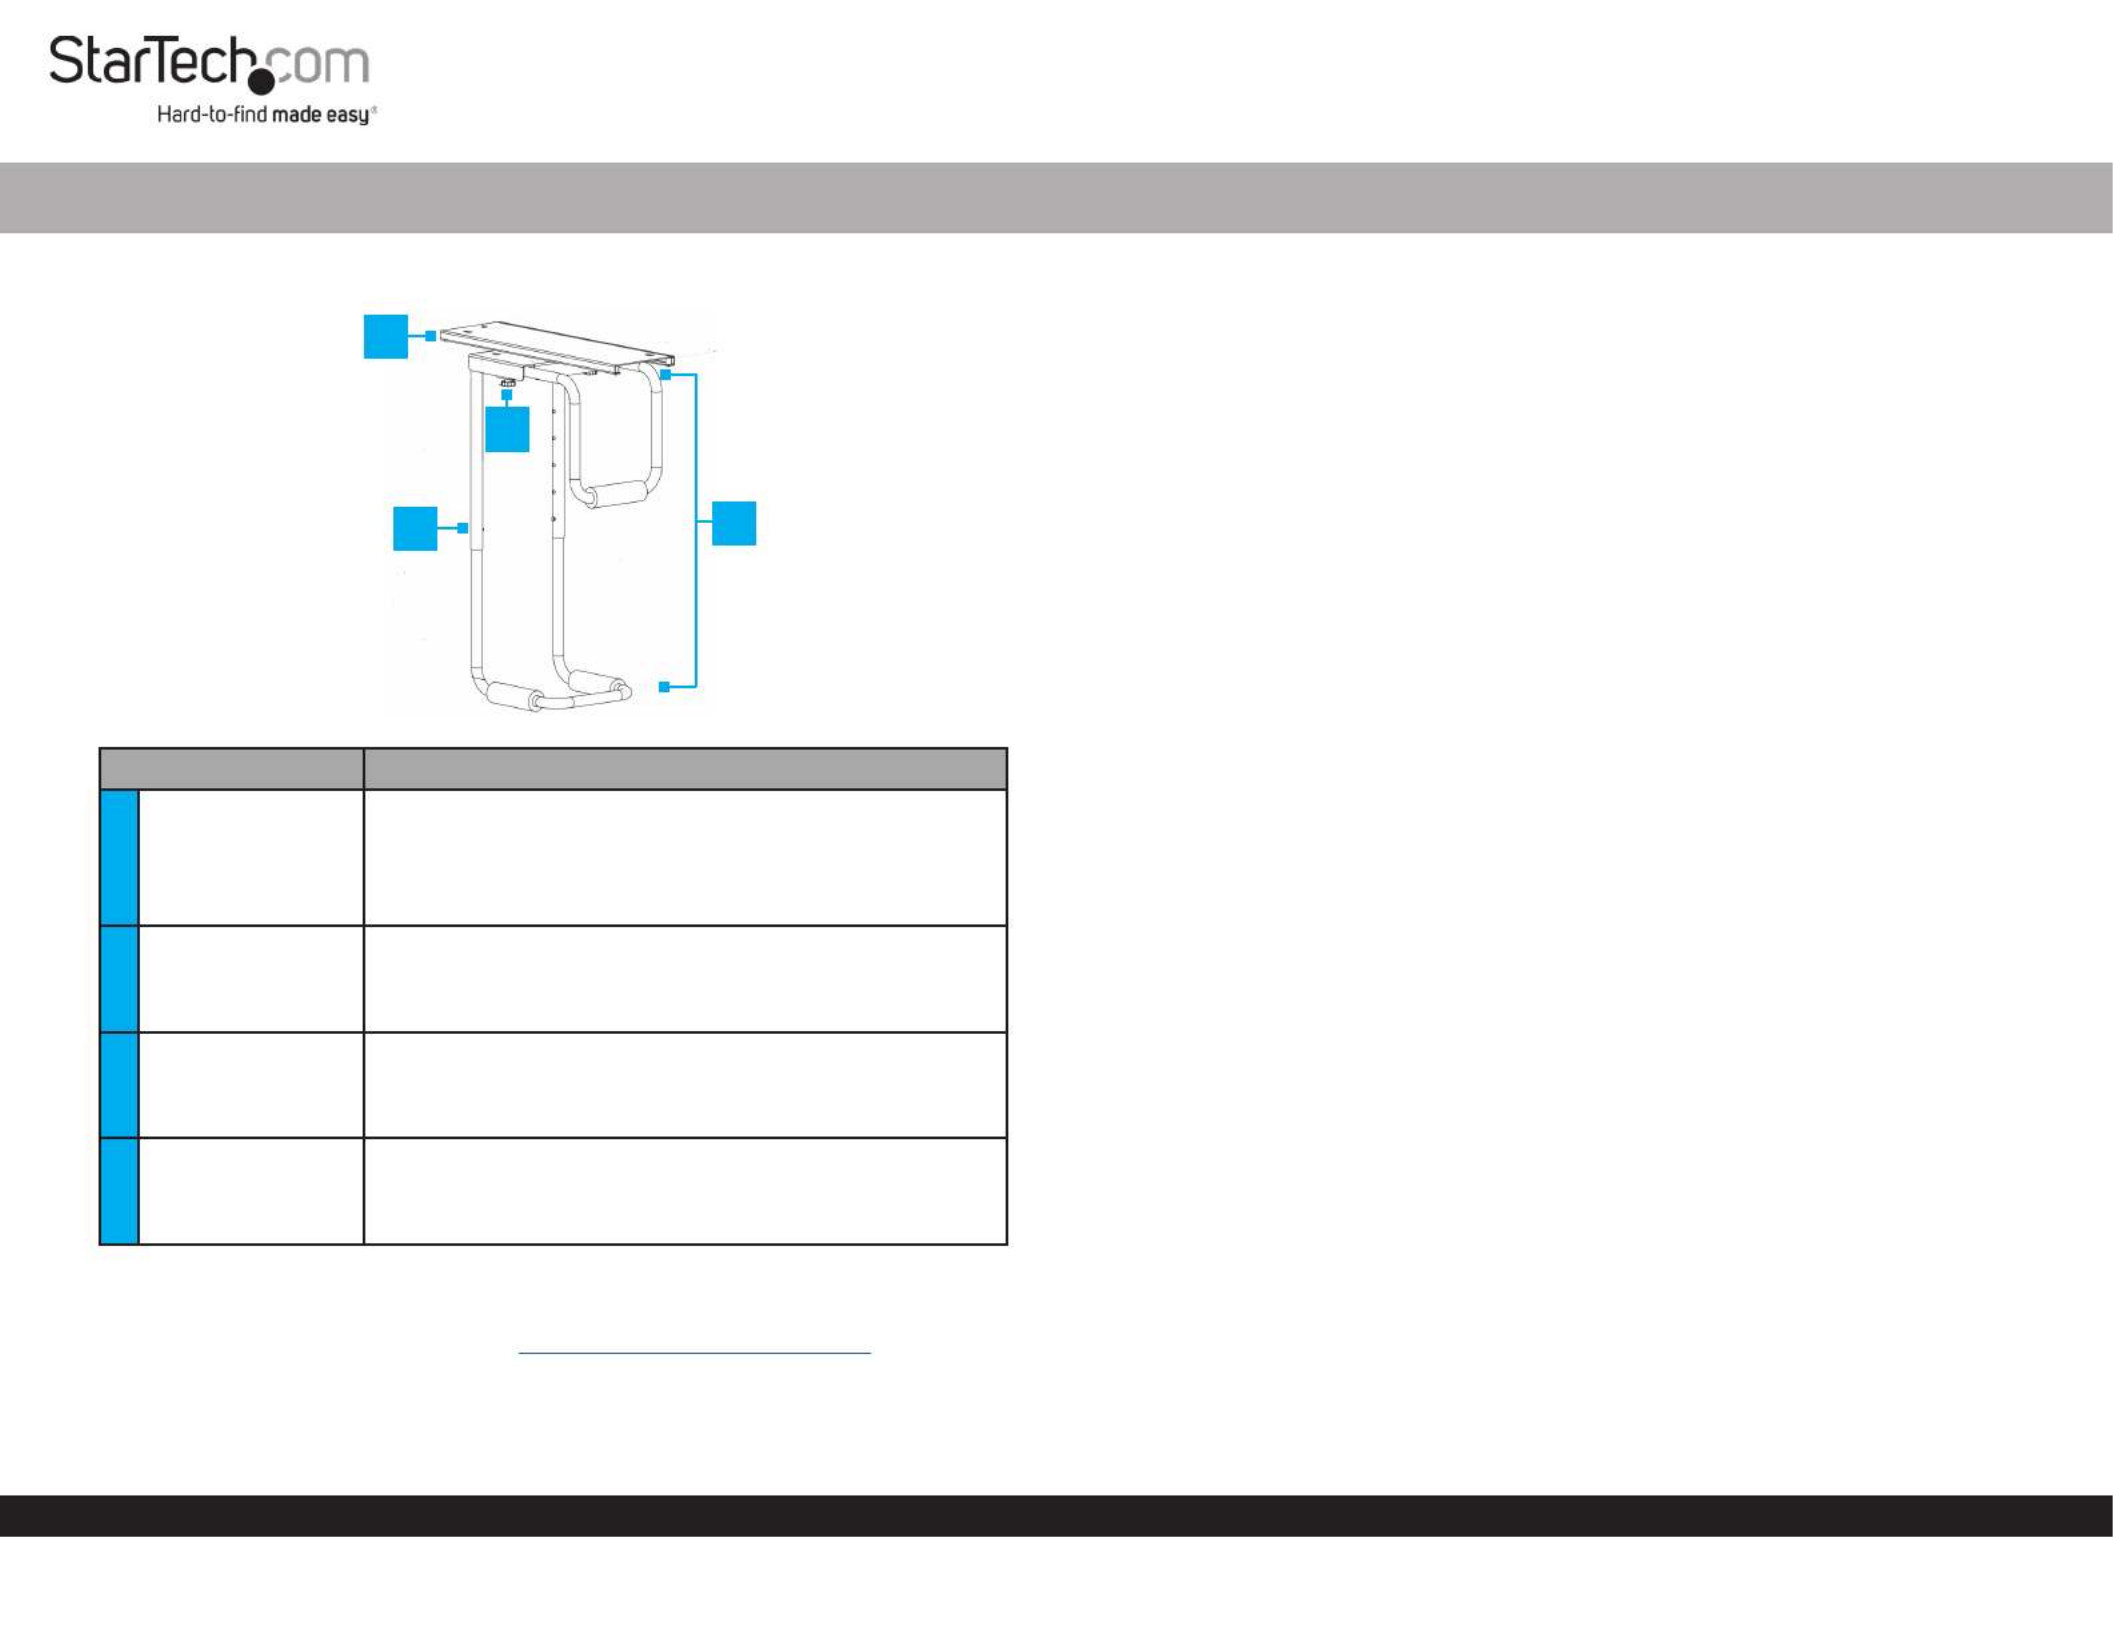
Product Diagram (CPUMNTUD)
Part Function
1Mounting Plate
• Allows for lateral adjustments.
• Mounts the into place.CPU Holder
Note: The needs a minimum table CPU Holder
thickness of .75” (19mm).
2Adjustment
buttons (2)
• Allows for height adjustments.
Note: The has a height range of minimum CPU Holder
14” (357mm) and maximum 21.9” (557mm).
3Adjustment
Knobs (2)
• Allows for width adjustments.
Note: The has a width range of minimum CPU Holder
4.84” (123mm) and maximum 9.96” (253mm).
4CPU Holder
• Mounts the CPU.
Note: The has a maximum weight CPU Holder
capacity of 66 lbs (30 kg).
Requirements
For the latest requirements, please visit .
www.startech.com/CPUMNTUD
CPU Table Mount
Installation
Notes: StarTech.com is not responsible for any damages related to the installation of
this product.
The needs a minimum table thickness of .75” (19mm).CPU Holder
Please refer to the warning statements prior to installation.
Mounting Plate
1. Align the into position on the mounting surface.Mounting Plate
2. Insert the (6) through the (6) on the Mounting Screws Mounting Holes Mounting
Plate and into the mounting surface.
3. Using a , tighten the (6). Be careful not Phillips Head Screwdriver Mounting Screws
to over-tighten.
CPU Holder
• Align the on the bottom of the with the on the Swivel CPU Holder Rails Mounting
Plate Rails Swivel Rails. Make sure that the on the are properly aligned with the on
the so that you can easily slide the across the .Mounting Plate CPU Holder Rails
Stopper Installation
1. Align two of the with the (2), on one end of the Stoppers Stopper Holes Mounting
Plate. Stopper Mounting Plate Rails Insert the between the base of the and the on
the .Mounting Plate
2. Insert the through the and into the .Stopper Screw Mount Plate Rail Stopper
3. Using a , tighten the (2). Be careful not Phillips Head Screwdriver Stopper Screws
to over-tighten.
Adjusting the CPU Holder
Width
The has a width range of 4.84” (123mm) - 9.96” (253mm).CPU Holder
1. Loosen the two located on either side of the .Adjustment Knobs CPU Holder
2. Slide the away from the .Width Adjustment Bar CPU Holder
3. Once the is at the desired width, tighten the Width Adjustment Bar Adjustment
Knobs Width Adjustment Bar to lock the in place.
4
1
3
2
Problemløsning StarTech.com CPUMNTUD
Hvis du har læst manualen omhyggeligt, men ikke fundet en løsning på dit problem, bed andre brugere om hjælp
Specifikationer
| Type: | CPU-holder under skrivebord |
| Bredde: | 253 mm |
| Dybde: | 213 mm |
| Højde: | 665 mm |
| Vægt: | 5000 g |
| Brugervejledning: | Ja |
| Produktfarve: | Sort |
| Pakkevægt: | 5440 g |
| Materiale: | Plastic, Steel |
| Certificering: | RoHS |
| Pakkens dimensioner (BxDxH): | 245 x 260 x 546 mm |
| Harmoniseret systemkode (HS): | 84733080 |
| Højdejustering: | Ja |
| Drejevinkel område: | 0 - 360 ° |
| Maksimal vægtkapacitet: | 30 kg |
| Skruer inkluderet: | Ja |
| Justerbar bredde: | Ja |
| Antal skruer: | 8 |
| Monteringsplade inkluderet: | Ja |
| Anbefalet chassis type: | Tower |
| Antal propper inkluderet: | 4 |
| Skumark inkluderet: | Ja |
| Computer bredde understøttes (vandret) (min): | 123 mm |
| Computer bredde understøttes (vandret) (maks): | 253 mm |
| Computer højde understøttes (vandret) (min): | 357 mm |
| Computer højde understøttes (vandret) (maks): | 557 mm |