Speco Technologies SXA400 Brugsanvisning
Her er Speco Technologies SXA400 (Ikke kategoriseret) brugervejledning. 2 sider på sprog Engelsk med en vægt på 995,059.0 Mb. Hvis du ikke kan finde svar på dit problem Spørg vores community.
Side 1/2
®
SXA200 | SXA300 | SXA400
STEP 1
1. Mount the Long Rails (SPM-A-55 or SPM-A-42)
to the Solar Panel using the existing holes on
the rear of the panel.
2. Bolt 4 points per Solar Panel.
3. Max width between holes should be 38”
(drilling may be required).
STEP 2
1. Panels should face directly south.
2. Attach the engraved SPM-LB-L-ENG and (1) SPM-LB-R to
the SPM-A-55 or SPM-A-42 rails using the provided hardware.
Attach the two SPM-A-32 braces to the
lower SPM-C-35.
Assembly
Step 1
Step 2
Step 3
Step 4
Step 5
Mount the long Rails (SPM-A-55 or SPM-A-42) to the
Solar Panel using the existing holes on the rear of
the panel. Bolt 4 points per Solar Panel.
Max width between holes should be 38” (drilling
may be required).
Panels should face directly south. Attach the engraved SPM-
LB-L-ENG and (1) SPM-LB-R to the SPM-A-55 or SPM-A-42
rails using the provided hardware. Set the adjustment
angle using the calculator found by scanning the QR Code
or at:
http://www.vorpenergy.com/resources/calculators/
Attach the two SPM-C-35 channels to the pole using the provided hose clamps. Tighten
the hose clamps of the upper SPM-C-35 at the height the top of the solar panel will
be mounted. Leave the two lower hose clamps slightly loose so the lower SPM-C-35
can be adjusted later. Attach the second pair of clips, SPM-LB-L and SPM-LB-R to the
lower SPM-C-35.
Attach the solar panel assembly completed in step two, to the upper SPM-C-35.
Attach the SPM-A-32 braces to the appropriate holes in the SPM-A-55 or
SPM-A-42 rails. Check that the angle is correct and tighten all the bolts. To
adjust the angle, loosen the appropriate bolts and hose clamps that hold the
lower SPM-C-35. Lower or raise the lower SPM-C-35 and re-tighten all hose
clamps and bolts.
Phone : + (208) 904-0424
E-Mail : support@vorpenery.com
4774 South Hwy 191
Rexburg, ID 83440
Hardware kit includes:
(27) ⁄”-18 x 1”
(27) ⁄” Flat washers
(27) ⁄”
Lock washers
(27) ⁄”-18
Hex nuts
spm-55x / SpM-42x
Watch this Short Installation Video
Scan the QR Code or find it on VorpEnergy.com
http://www.vorpenergy.com/resources/training-videos/
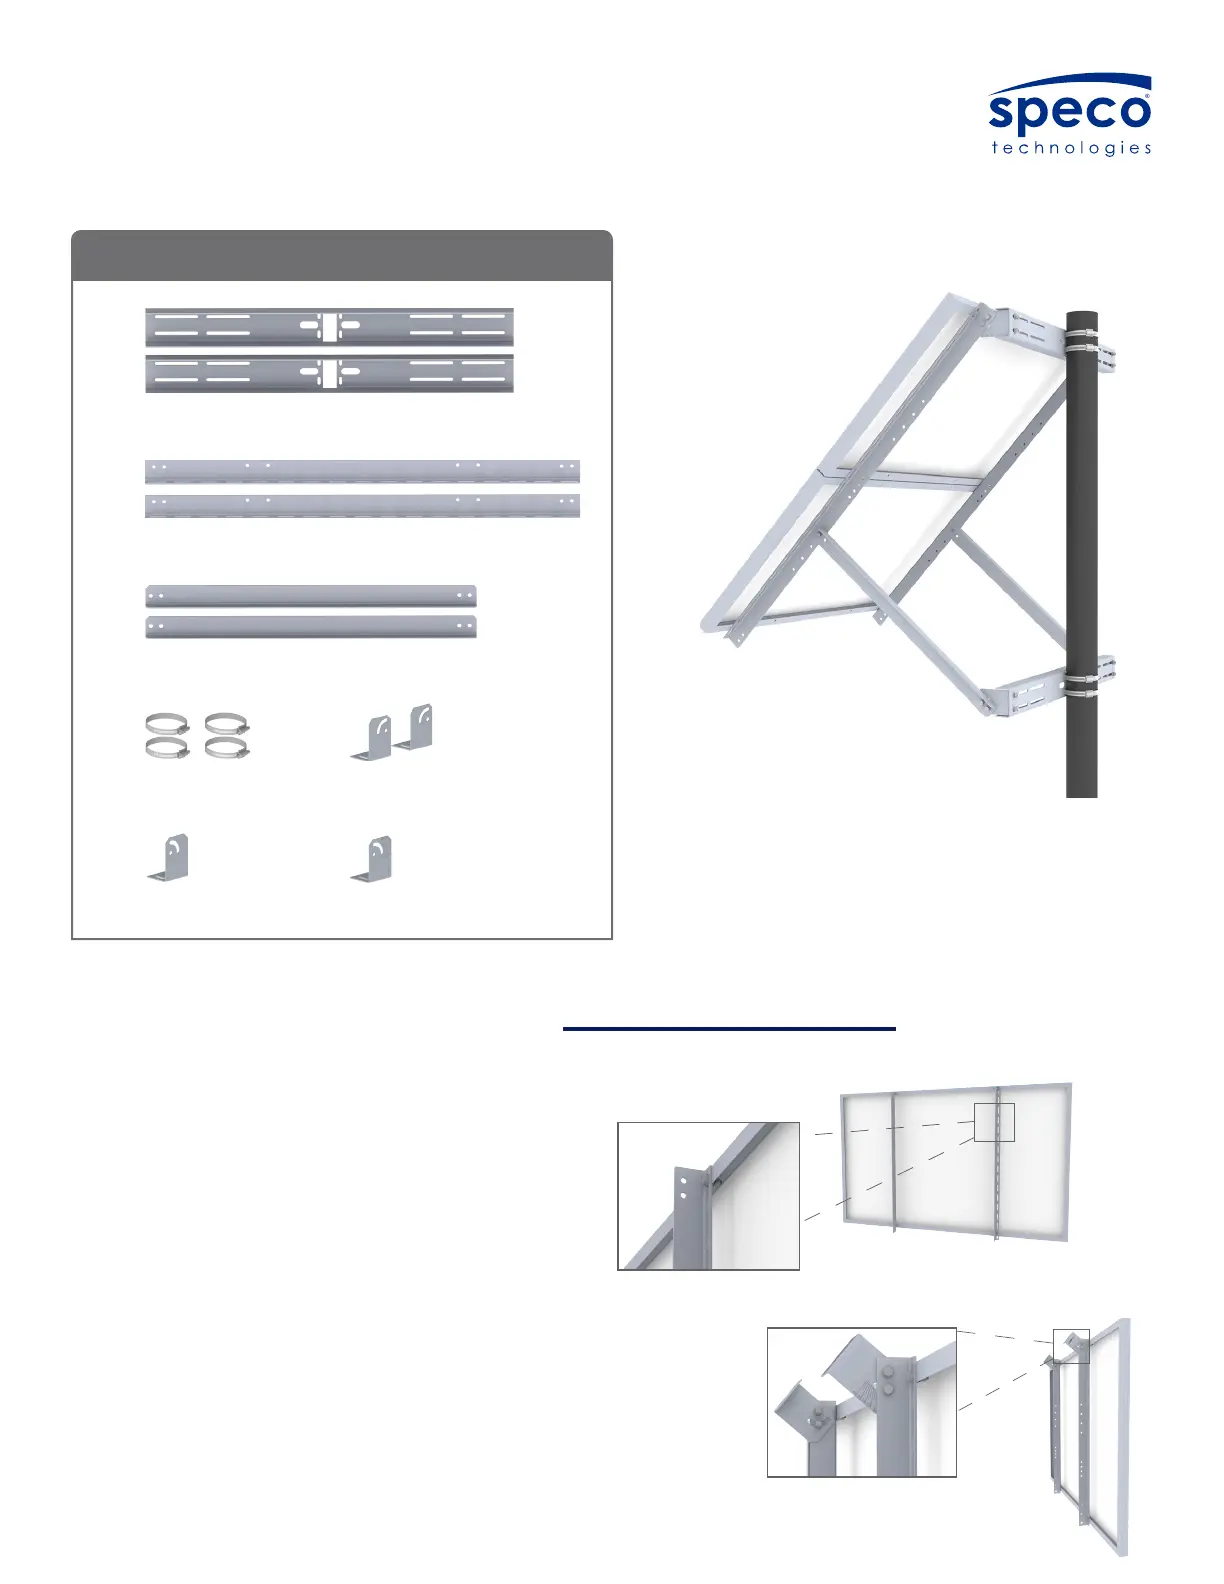
Components list
SPM-C-35 (2x)
SPM-A-55 (2x) or SPM-A-42 (2x)
HOSE CLAMPS (4x)
SPM-A-32 (2x)
SPM-LB-L-ENG (1x)SPM-LB-L (1x)SPM-LB-R (2x)
install guide
Accessories
2x
2x
2x
1x
2x
4x
1x
Hardware kit includes:
(27) ⁄”-18 x 1”
(27) ⁄” Flat washers
(27) ⁄”
Lock washers
(27) ⁄”-18
Hex nuts
spm-55x / SpM-42x
Watch this Short Installation Video
Scan the QR Code or find it on VorpEnergy.com
http://www.vorpenergy.com/resources/training-videos/
Components list
SPM-C-35 (2x)
SPM-A-55 (2x) or SPM-A-42 (2x)
HOSE CLAMPS (4x)
SPM-A-32 (2x)
SPM-LB-L-ENG (1x)SPM-LB-L (1x)SPM-LB-R (2x)
install guide
SPM-A-55 or SPM-A-42
Hardware kit includes:
(27) ⁄”-18 x 1”
(27) ⁄” Flat washers
(27) ⁄”
Lock washers
(27) ⁄”-18
Hex nuts
spm-55x / SpM-42x
Watch this Short Installation Video
Scan the QR Code or find it on VorpEnergy.com
http://www.vorpenergy.com/resources/training-videos/
Components list
SPM-C-35 (2x)
SPM-A-55 (2x) or SPM-A-42 (2x)
HOSE CLAMPS (4x)
SPM-A-32 (2x)
SPM-LB-L-ENG (1x)SPM-LB-L (1x)SPM-LB-R (2x)
install guide
SPM-C-35
Hardware kit includes:
(27) ⁄”-18 x 1”
(27) ⁄” Flat washers
(27) ⁄”
Lock washers
(27) ⁄”-18
Hex nuts
spm-55x / SpM-42x
Watch this Short Installation Video
Scan the QR Code or find it on VorpEnergy.com
http://www.vorpenergy.com/resources/training-videos/
Components list
SPM-C-35 (2x)
SPM-A-55 (2x) or SPM-A-42 (2x)
HOSE CLAMPS (4x)
SPM-A-32 (2x)
SPM-LB-L-ENG (1x)SPM-LB-L (1x)SPM-LB-R (2x)
install guide
SPM-A-32
Hardware kit includes:
(27) ⁄”-18 x 1”
(27) ⁄” Flat washers
(27) ⁄”
Lock washers
(27) ⁄”-18
Hex nuts
spm-55x / SpM-42x
Watch this Short Installation Video
Scan the QR Code or find it on VorpEnergy.com
http://www.vorpenergy.com/resources/training-videos/
Components list
SPM-C-35 (2x)
SPM-A-55 (2x) or SPM-A-42 (2x)
HOSE CLAMPS (4x)
SPM-A-32 (2x)
SPM-LB-L-ENG (1x)SPM-LB-L (1x)SPM-LB-R (2x)
install guide
Hose Clamps
Hardware kit includes:
(27) ⁄”-18 x 1”
(27) ⁄” Flat washers
(27) ⁄”
Lock washers
(27) ⁄”-18
Hex nuts
spm-55x / SpM-42x
Watch this Short Installation Video
Scan the QR Code or find it on VorpEnergy.com
http://www.vorpenergy.com/resources/training-videos/
Components list
SPM-C-35 (2x)
SPM-A-55 (2x) or SPM-A-42 (2x)
HOSE CLAMPS (4x)
SPM-A-32 (2x)
SPM-LB-L-ENG (1x)SPM-LB-L (1x)SPM-LB-R (2x)
install guide
SPM-LB-R
Hardware kit includes:
(27) ⁄”-18 x 1”
(27) ⁄” Flat washers
(27) ⁄”
Lock washers
(27) ⁄”-18
Hex nuts
spm-55x / SpM-42x
Watch this Short Installation Video
Scan the QR Code or find it on VorpEnergy.com
http://www.vorpenergy.com/resources/training-videos/
Components list
SPM-C-35 (2x)
SPM-A-55 (2x) or SPM-A-42 (2x)
HOSE CLAMPS (4x)
SPM-A-32 (2x)
SPM-LB-L-ENG (1x)SPM-LB-L (1x)SPM-LB-R (2x)
install guide
SPM-LB-L
SPM-LB-ENG
Hardware kit includes:
(27) ⁄”-18 x 1”
(27) ⁄” Flat washers
(27) ⁄”
Lock washers
(27) ⁄”-18
Hex nuts
spm-55x / SpM-42x
Watch this Short Installation Video
Scan the QR Code or find it on VorpEnergy.com
http://www.vorpenergy.com/resources/training-videos/
Components list
SPM-C-35 (2x)
SPM-A-55 (2x) or SPM-A-42 (2x)
HOSE CLAMPS (4x)
SPM-A-32 (2x)
SPM-LB-L-ENG (1x)SPM-LB-L (1x)SPM-LB-R (2x)
install guide
SXA200
SXA300
SXA400
ASSEMBLY
Installation Guide
Solar Panel Mounting
Problemløsning Speco Technologies SXA400
Hvis du har læst manualen omhyggeligt, men ikke fundet en løsning på dit problem, bed andre brugere om hjælp
Specifikationer
| Mærke: | Speco Technologies |
| Kategori: | Ikke kategoriseret |
| Model: | SXA400 |