Sony
Overvågningskamera
SNC-WR632
Sony SNC-WR632 Brugsanvisning
Her er Sony SNC-WR632 (Overvågningskamera) brugervejledning. 2 sider på sprog med en vægt på 1,143,073.0 Mb. Hvis du ikke kan finde svar på dit problem Spørg vores community.
Side 1/2
About the Manuals
Installation Manual (this document)
This Installation Manual describes the names and functions of parts and controls
of the Network Camera, gives connection examples and explains how to set up
the camera. Be sure to read the Installation Manual before operating.
SNC easy IP setup Guide (stored in the CD-ROM)
User’s Guide/Application Guide (Web)
The User’s Guide describes how to set up the camera and how to control the
camera via a Web browser.
After installing and connecting the camera correctly, operate referring to this
User’s Guide.
Using the software
The supplied CD-ROM includes the setup program for assigning an IP address.
The information for how to set up an IP address is also included in the disc in PDF
format.
User’s Guide and Application Guide can be downloaded from the disc, or the
following URL:
http://www.sony.net/ipela/snc
Using the CD-ROM manual
The manual can be read on a computer with Adobe Reader installed.
You can download Adobe Reader free from the Adobe website.
1 Open the index.html file in the CD-ROM.
2 Select and click on the manual that you want to read.
Note
If you have lost or damaged the CD-ROM, you can purchase a new one from your
Sony dealer or Sony service counter.
Adobe and Acrobat Reader are trademarks of Adobe Systems Incorporated in the
United States and/or other countries.
Assigning the IP address
Assign the IP address using the setup program in the supplied CD-ROM.
For details on how to set up the IP address, see SNC easy IP Setup Guide.
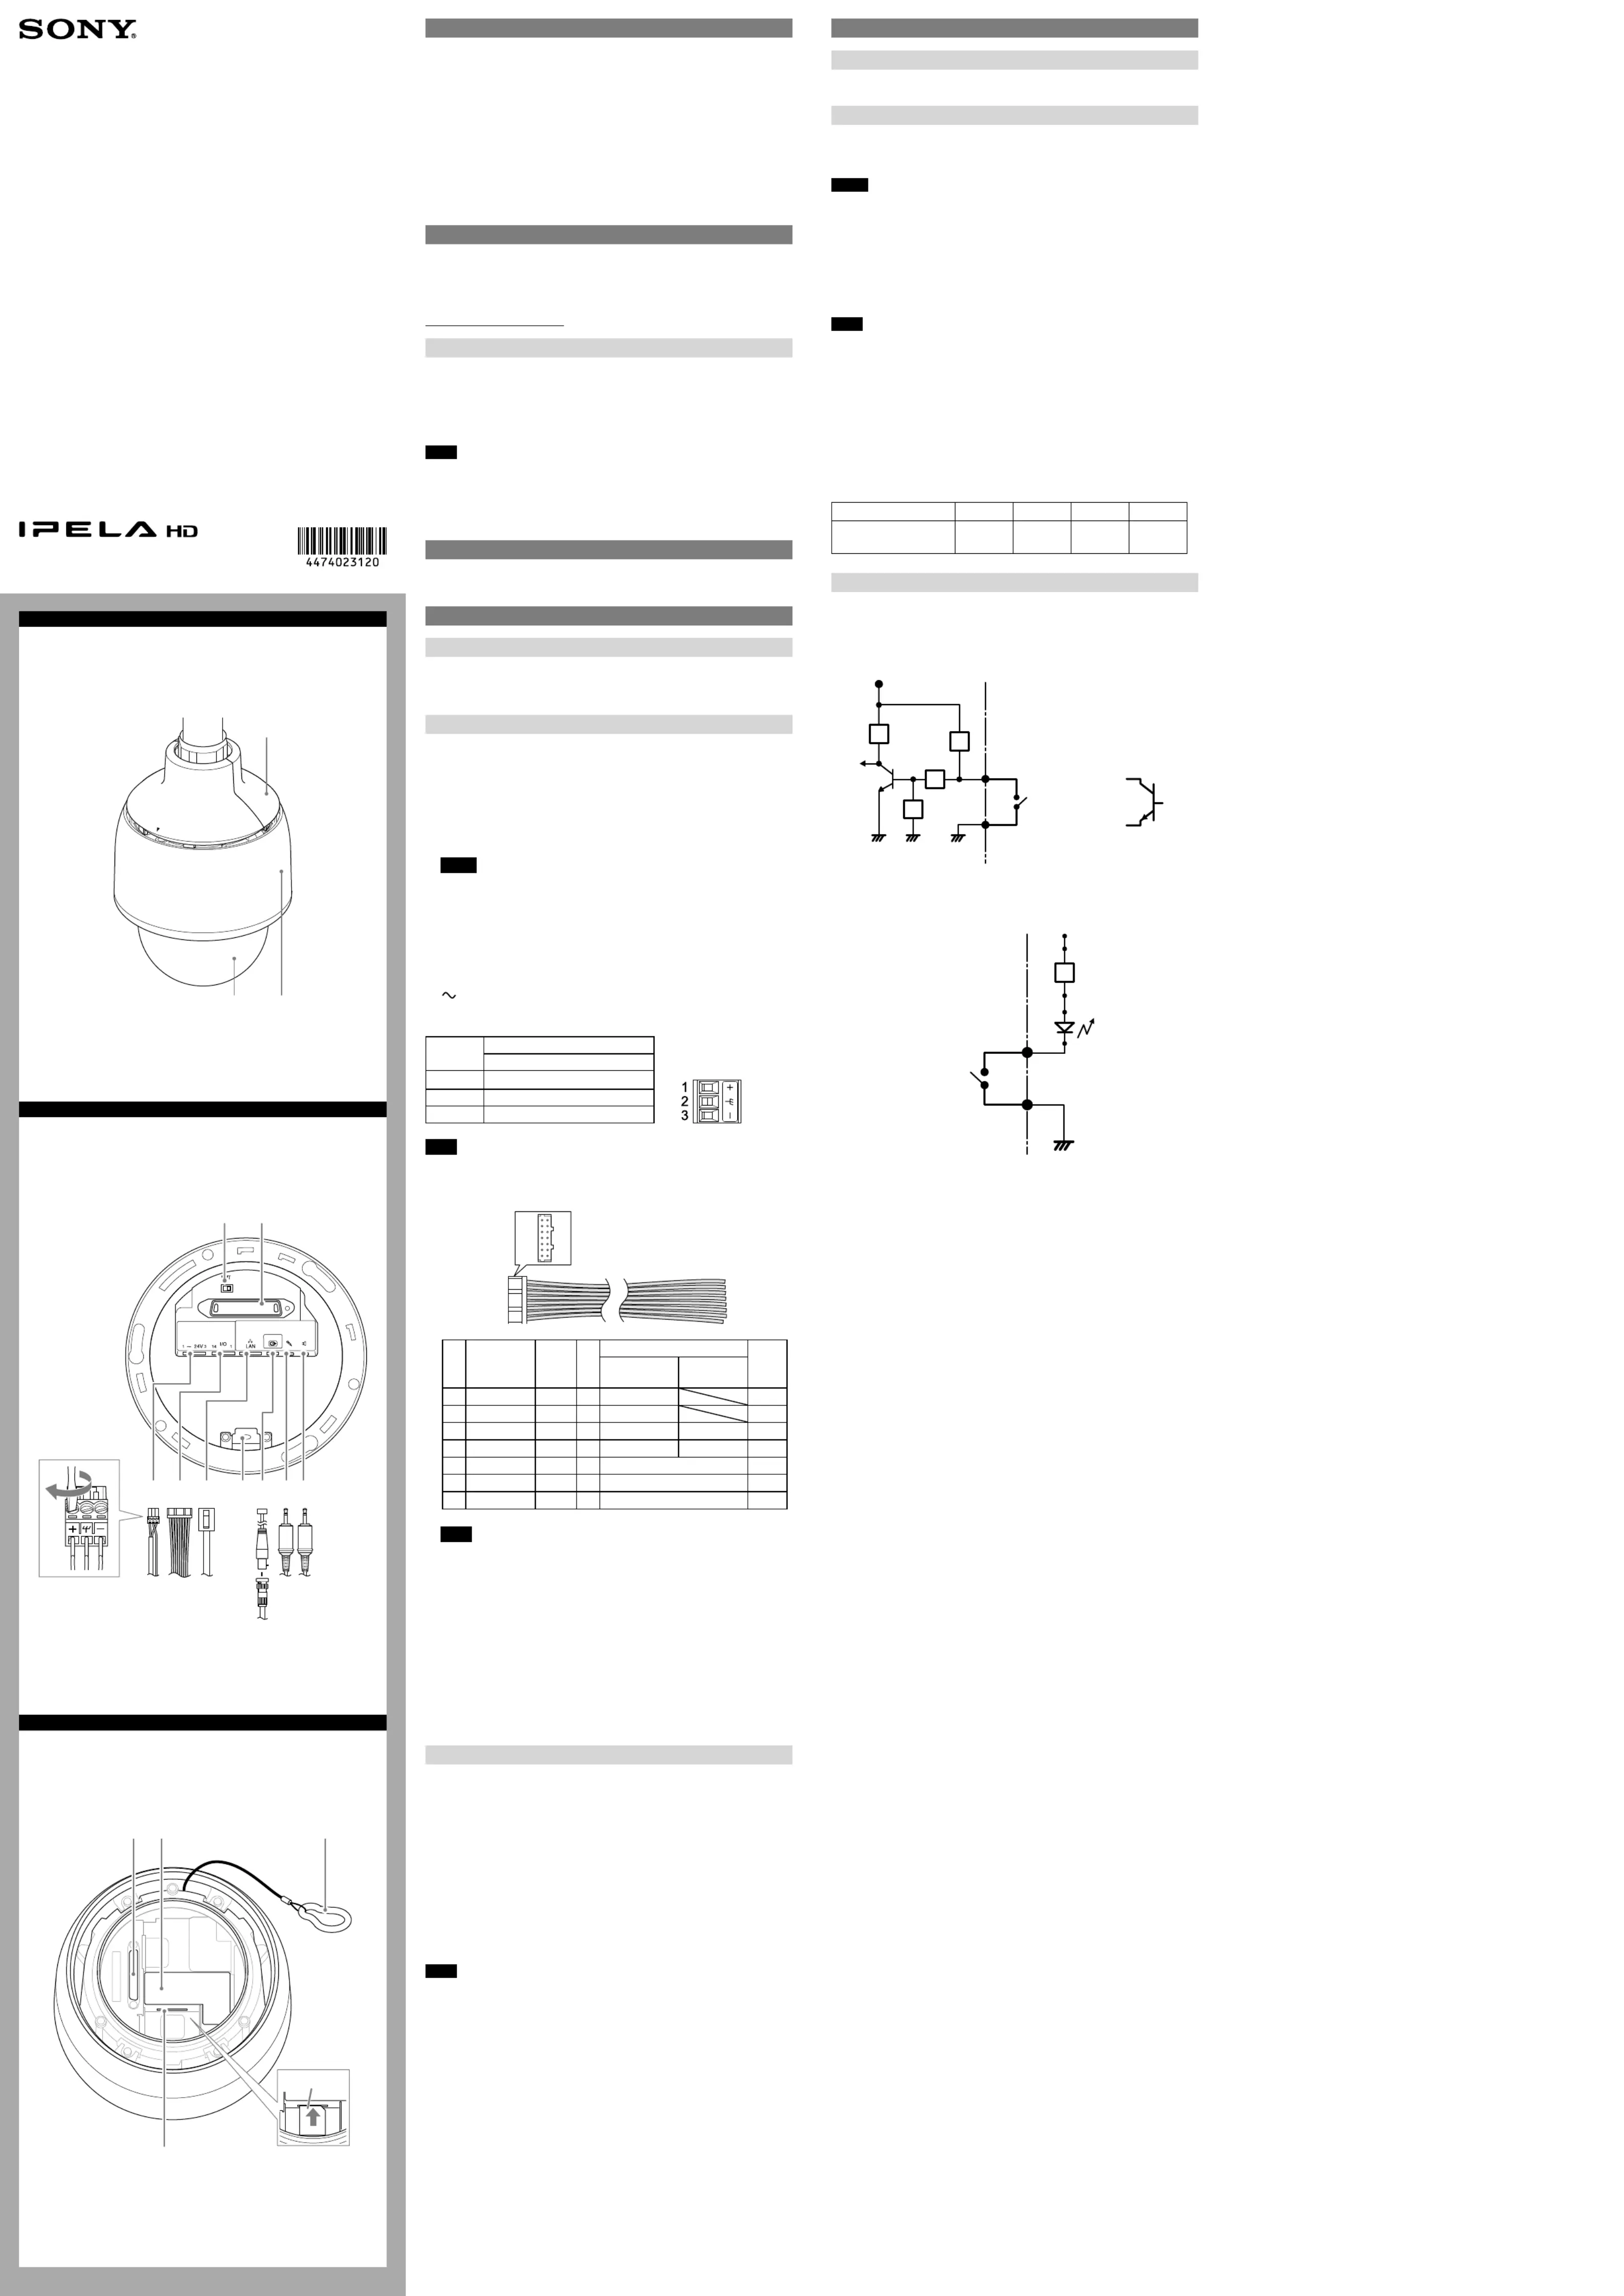
Location and Function of Part
Camera (Front)
Top sunshade
Dome cover
Sunshade
Top Unit (Bottom)
Reset switch
This switch returns the setting of the device to the factory default setting.
1. Move the INIT switch in the direction indicated by and connect with
camera.
2. Turn on power and wait 1 minute. After the initialization is completed, the
camera starts.
3. Check that the camera has started and turn off the power to remove camera.
4. Move the INIT switch back to its original position.
Notes
Resetting the device removes all customized settings. It is recommended ˎ
that users save the settings as necessary. Instructions on how to save
settings are available in the User’s Guide.
The reset switch should always be returned to its original position. ˎ
Otherwise your device is reset to its factory default setting whenever it is
turned on.
Camera connection terminal
Connect to the camera connection terminal of the camera.
AC 24 V (power input) terminal
Use the supplied AC connector to connect to the 24 V AC power supply system.
Pin No.
Pin name
AC24V
1 AC24V+
2 Frame Ground
3 AC 24V-
Note
Be sure to connect the Frame Ground to the specified terminal.
I/O (Input/Output) port
Provides four sensor inputs and two alarm outputs.
1
7
8
14
Pin
No.
Pin name
Color
RS422/
RS485(Full)
RS485
(Half)
8
9
10
11
12
13 Alarm Out 2-
Alarm Out 2+
14
GND
Yellow
Orange
Red
Brown
Black
Purple
Purple
Tx-/Rx-
Tx+/Rx+
Rx-
Rx+
Tx-
Tx+
Pin name Color
GND
Blue
Blue
Yellow
Orange
Red
Brown
Black
Alarm Out 1-
Alarm Out 1+
Sensor in 4
Sensor in 3
Sensor in 2
Sensor in 1
Pin
No.
1
2
3
4
5
6
7
Note
For details about functions and settings, see the user’s guide.
LAN (network) port (RJ-45)
Connect to a 10BASE-T or 100BASE-TX network using a network cable (UTP,
category 5).
Harness holder
Attach the supplied band mount.
(video output) terminal
Outputs a composite video signal. Use the supplied monitor cable to connect to
the camera.
(microphone input) terminal (minijack, monaural)
Connect a commercially available microphone.
(line output) terminal (minijack, monaural)
Connect to a commercially available speaker with a built-in amplifier.
Camera (Top)
Camera connection terminal
Connect to the camera connection terminal of the top unit.
Rating Label
This label shows the name of device and its electric rating.
Built-in wire rope
The wire rope is used for fall-prevention.
SD memory card slot
This slot is used for an optional SD memory card.
Images captured by the camera can be stored into an inserted memory card.
Be sure that the printed side of a memory card and the product specifications
label face in the same direction, and then insert the card firmly into the slot. ( )a
This unit only supports memory card formats compatible with the SD/SDHC
standards.
Note
For information about Sony-approved SD memory cards, contact your Sony
dealer.
Connection
Connecting to the Network
Connect the LAN port of the camera unit to a router or hub in the network using
the network cable (not supplied).
Connecting the Power Source
The following power sources can be used.
HPoE+ 4 line power-supply ˎ
24 V AC ˎ
Notes
Do not turn o the camera immediately after turning it on. Wait for at least ve ˎ
minutes before turning o the camera.
If power is supplied by an HPoE+ system, do not install the wiring for 24 V AC. ˎ
Perform grounding of the frame ground only.
HPoE+ 4 line power-supply
The power is supplied by using PD9501G of PowerDsine or a similar power supply
device via a network cable.
For details, refer the manual of the power supply device.
Note
If the power is supplied by HPoE+, the integrated heater is not available. Use the
camera in the activation temperature range of 0 °C to 50 °C (32 °F to 122 °F).
Connecting to a 24 V AC power source supply
Connect the 24 V AC power supply system to the power input terminal of the
camera. The AC power cable is not supplied.
Use a 24 V AC power source isolated commercial power supply. ˎ
The usable voltage range is as follows: ˎ
24 V AC: 21.6 to 26.4 V
Use a UL cable (VW-1 style 10368) for 24 V AC connection. ˎ
Recommended power cable
24 V AC
Cable(AWG) #22 #20 #18 #16
Maximum cable length
(m (feet))
5 (16.4) 8 (26.2) 15 (49.2) 21 (68.9)
Connecting the I/O Cable
Wiring diagram for sensor input
Mechanical switch/open collector output device
Camera inside
3.3 V
2.2 kohms
GND
Mechanical
switch
Open collector
output device
Outside
or
GNDGND
10 kohms
10 kohms
10 kohms
GND
Sensor Input 1, 2, 3, 4
Wiring diagram for alarm output
Camera inside
Alarm Output +
Magnet relay
24 V AC
24 V DC,
1 A or less
Alarm Output –
Outside
24 V DC
Circuit example
GND
R
(continued on the reverse side)
4-474-023- (1)12
© 2013 Sony Corporation
Printed in China
Network Camera
SNC-WR632/WR602
Installation Manual
Before operating the unit, please read this manual thoroughly and
retain it for future reference.
A
B
C
Printed side
Problemløsning Sony SNC-WR632
Hvis du har læst manualen omhyggeligt, men ikke fundet en løsning på dit problem, bed andre brugere om hjælp
Specifikationer
| Kode for international beskyttelse (IP): | IP66 |
| Type: | IP-sikkerhedskamera |
| Vekselstrømsindgangsspænding: | 24 V |
| Vægt: | 4100 g |
| Brugervejledning: | Ja |
| Produktfarve: | Hvid |
| Kompatible hukommelseskort: | SDHC |
| Wi-Fi: | Ingen |
| Formfaktor: | Kuppel |
| Understøttede videotilstande: | 1080p |
| Opbevaringstemperatur (T-T): | -20 - 60 °C |
| Relativ luftfugtighed ved drift (H-H): | 20 - 80 % |
| Relativ luftfugtighed ved opbevaring (H-H): | 20 - 95 % |
| Format til analogt signal: | NTSC, PAL |
| Ethernet LAN-porte (RJ-45): | 1 |
| Ethernet LAN: | Ja |
| Understøttede videoformater: | H.264, M-JPEG |
| Understøttede lydformater: | AAC |
| Driftstemperatur (T-T): | -40 - 50 °C |
| Maksimal opløsning: | 1920 x 1080 pixel |
| Understøttede grafikopløsninger: | 352 x 288,704 x 576,720 x 480,720 x 576,1024 x 576 (WSVGA),1280 x 720 (HD 720),1920 x 1080 (HD 1080),640 x 480 (VGA) |
| Forbindelsesteknologi: | Ledningsført |
| Kabelteknologi: | 10/100Base-T(X) |
| Understøttede netværksprotokoller: | IPv4, TCP, UDP, ARP, ICMP, IGMP, HTTP, DHCP, DNS, NTP, RTP/RTCP, RTSP over TCP, SMTP over HTTP, IPv6, HTTPS, SNMP (v1, v2c, v3), SSL |
| Strømkilde type: | PoE |
| Monteringstype: | Væg |
| Diameter: | 2220 mm |
| Indbygget kortlæser: | Ja |
| Understøttet placering: | Udendørs |
| Mikrofonindgang: | Ja |
| Understøttede Windows-operativsystemer: | Windows 7 Professional, Windows 7 Professional x64, Windows 7 Ultimate, Windows 7 Ultimate x64, Windows 8 Pro, Windows 8 Pro x64, Windows Vista Business, Windows Vista Ultimate, Windows XP Home, Windows XP Professional |
| Hvidbalance: | ATW, Fluorescent L, Lamp, Manual, Outdoor |
| Sensortype: | CMOS |
| Samlet antal megapixels: | 2.38 MP |
| Optisk zoom: | 30 x |
| Digital zoom: | 12 x |
| Længde: | 324.1 mm |
| Hældningsvinkelområde: | 0 - 220 ° |
| Strøm over Ethernet (PoE): | Ja |
| Bredt dynamikområde (WDR): | Ja |
| Dag/nat funktion: | Ja |
| Minimumsbelysning: | 0.1 Lux |
| Panoreringsområde: | 0 - 360 ° |
| Optisk sensorstørrelse: | 1/2.8 " |
| Zoom kapacitet: | 360 |
| Billedhastighed: | 60 fps |
| Bevægelsessensor (video): | Ja |
| Brændviddeområde: | 4.3 - 129 mm |
| Kameraets lukkerhastighed: | 1/1 s - 1/10000 sek./side |
| Signal/støjforhold: | 50 dB |
| PTZ-kontrol: | Ja |
| Hældningshastighed: | 700 grader i sekundet |
| Panoreringshastighed: | 700 grader i sekundet |
| Minimum processor: | Intel Corei7 2.8 GHz |
| Minimum RAM: | 2048 MB |
| Aktiv manipulering af alarm: | Ja |
| Alarmindgang/-udgang: | Ja |