Panasonic
fotokamera
Lumix S1 II E
Panasonic Lumix S1 II E Brugsanvisning
Her er Panasonic Lumix S1 II E (fotokamera) brugervejledning. 2 sider på sprog med en vægt på 1,183,160.0 Mb. Hvis du ikke kan finde svar på dit problem Spørg vores community.
Side 1/2
Please read these instructions carefully before using this product, and save this
manual for future use.
Dear Customer,
Thank you for choosing Panasonic!
You have purchased one of the most sophisticated and reliable products on the market today.
Used properly, we’re sure it will bring you and your family years of enjoyment. Please take time
to fill in the information below. The serial number is on the tag located on the underside of your
camera. Be sure to as your convenient camera information source.retain this manual
Please note that the actual controls and components, menu items, etc. of your Digital Camera
may look somewhat different from those shown in the illustrations in this Owner’s Manual.
Information for Your Safety
∫Product identification marking
∫THE FOLLOWING APPLIES ONLY IN CANADA.
∫About the battery pack
0
Do not heat or expose to flame.
0Do not leave the battery(ies) in a car exposed to direct sunlight for a long period of time with
doors and windows closed.
0Do not expose to low air pressure at high altitudes.
0Do not expose to extremely low air pressure, as this may result in explosions or leakage of
flammable liquids and gases.
0Always use a genuine Panasonic Shutter Remote Control (DMW-RS2: optional).
0Always use a genuine Panasonic Tripod Grip (DMW-SHGR2/DMW-SHGR1: optional).
0Use an Ultra High Speed HDMI cable (Type A–Type A plug) with the length less than 3 m
(9.8 feet).
0Use a headphone cable with the length less than 3 m (9.8 feet).
0Use a stereo microphone cable with the length less than 3 m (9.8 feet).
0Keep the hot shoe cover out of reach of children to prevent swallowing.
0Keep the cover for the battery grip connector out of reach of children to prevent swallowing.
0Keep the memory card out of reach of children to prevent swallowing.
0Excessive sound pressure from earphones and headphones can cause hearing loss.
Standard Accessories
Product numbers correct as of May 2025.
Digital camera body
*1 This is attached to the camera at the time of purchase.
*2 This is supplied with Lens Kit DC-S1M2ESM.
*3 This is attached to the lens at the time of purchase.
0If any accessories are lost, customers in Canada should visit our support page at
www.panasonic.ca/english/support
for further information about obtaining replacement parts.
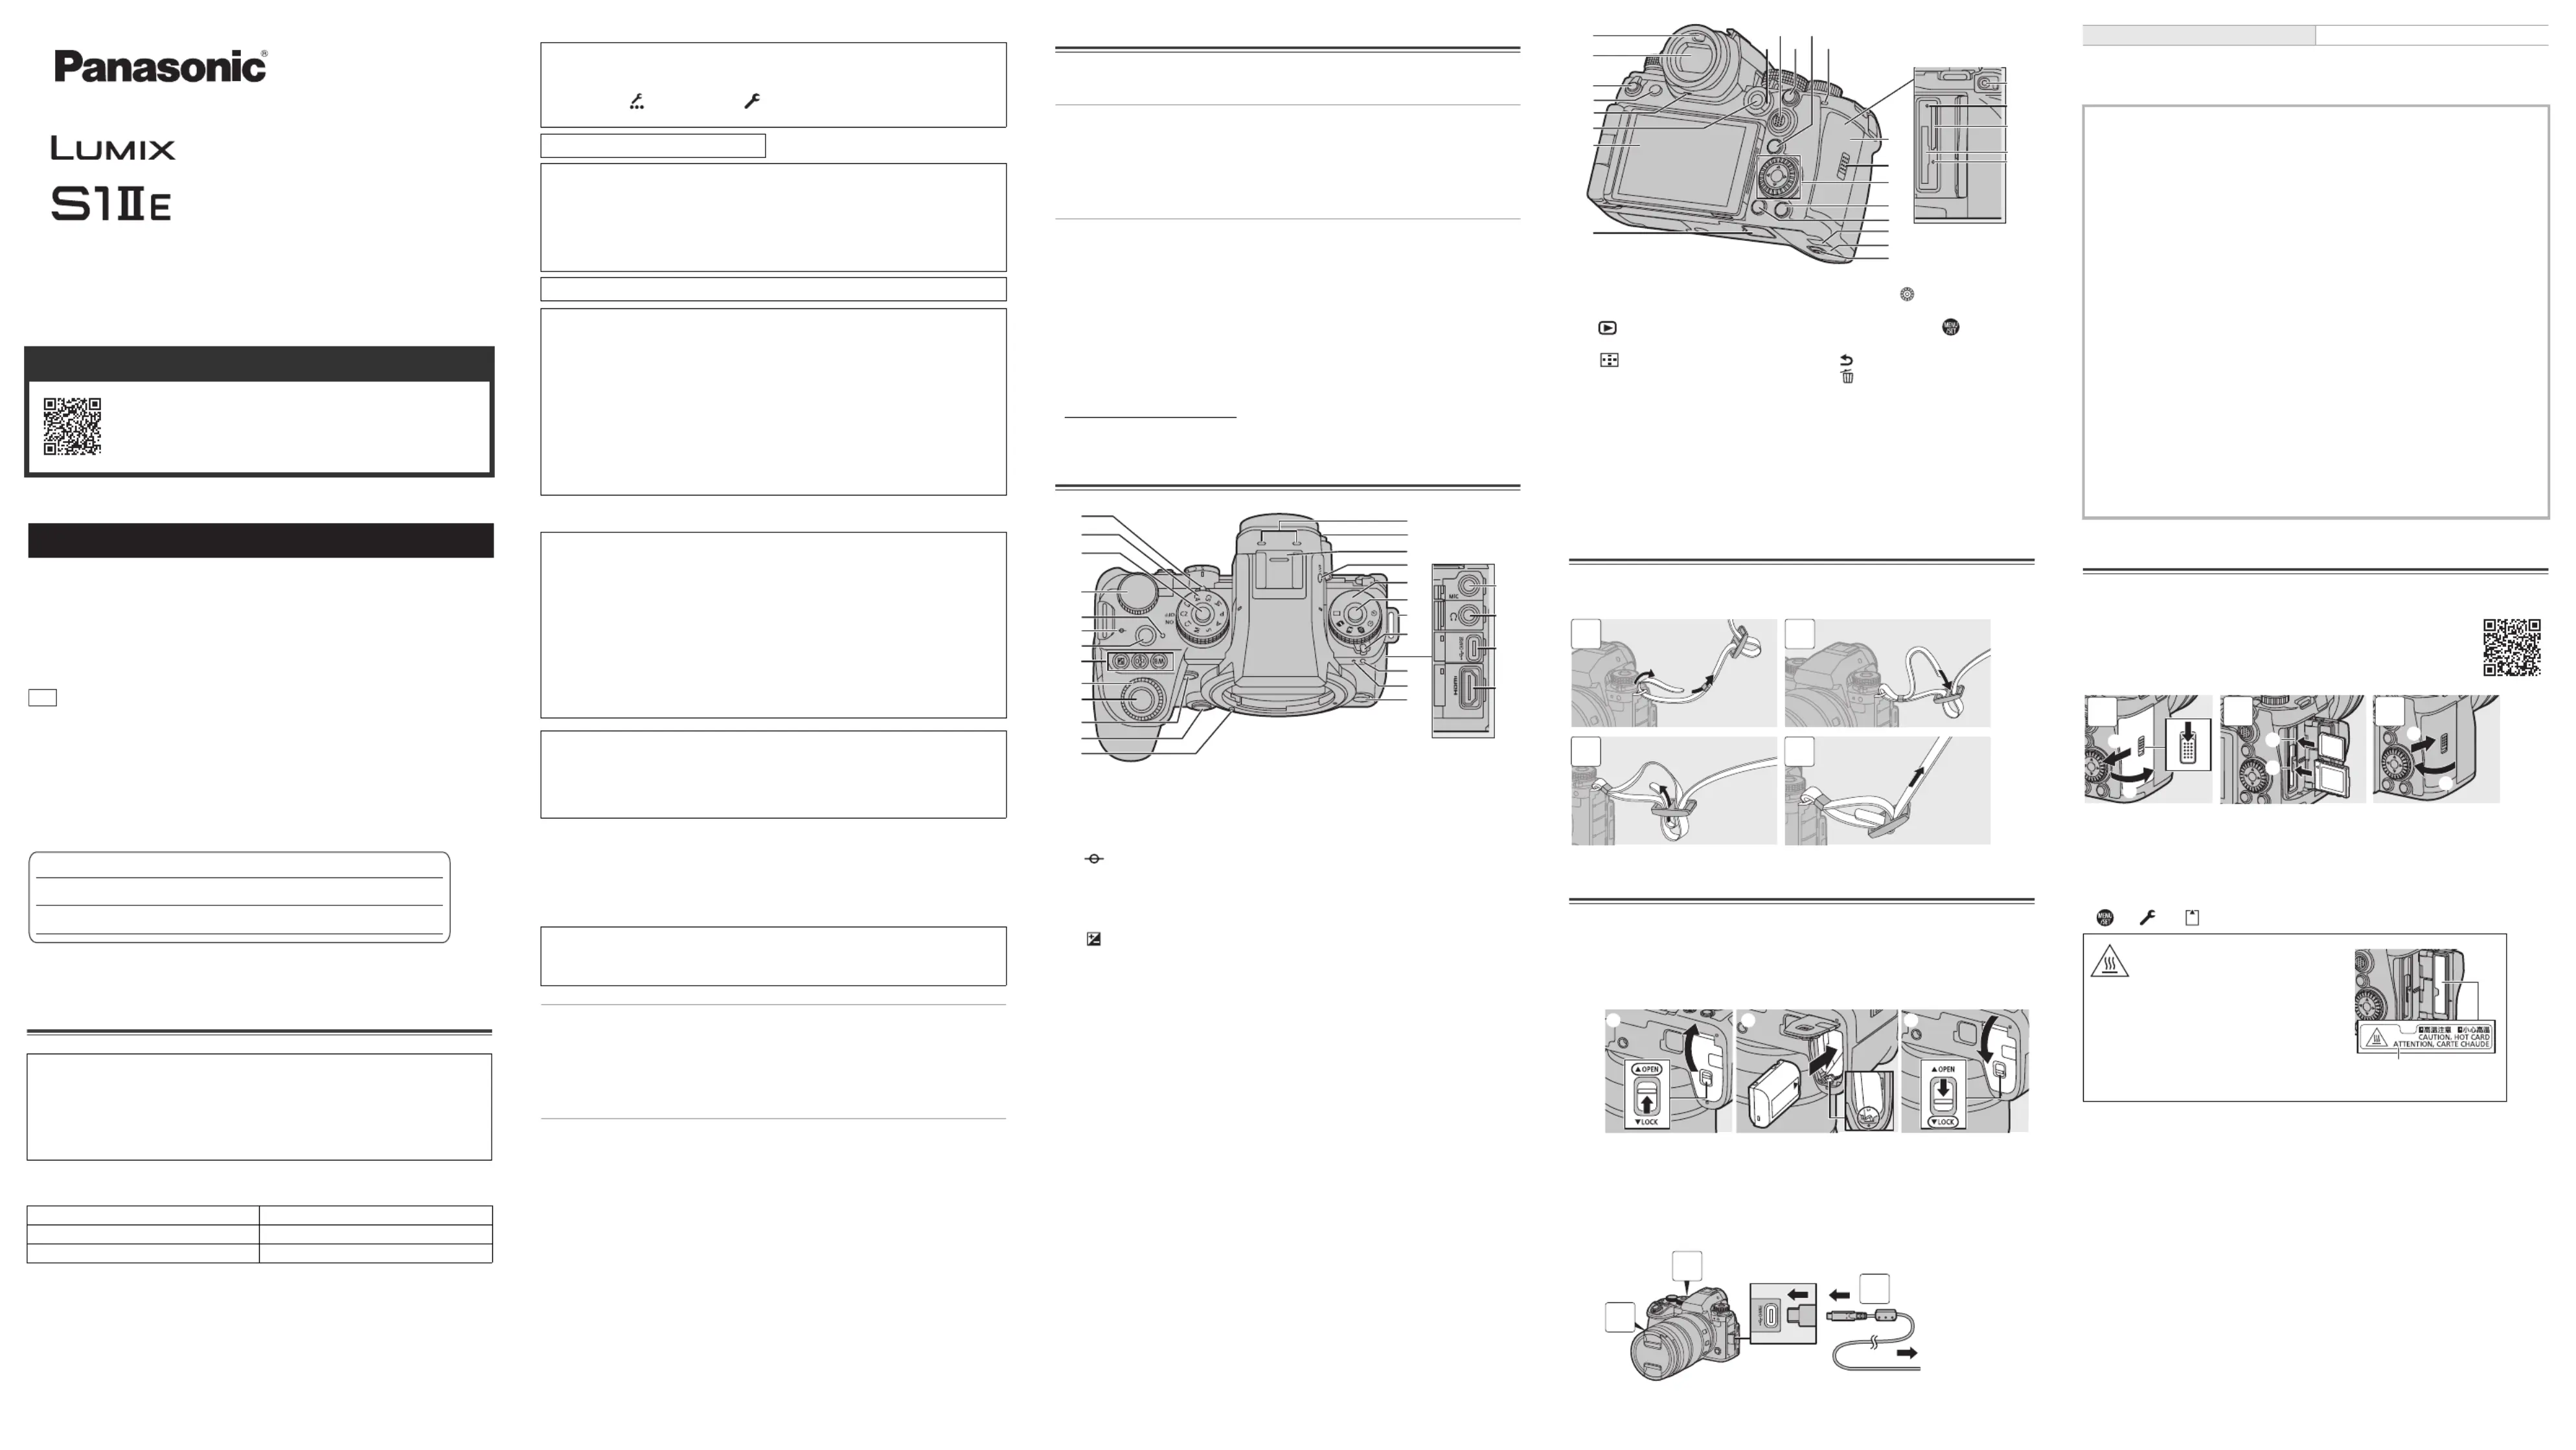
Names of Important Parts
Attaching a Shoulder Strap
Attach a shoulder strap to the camera with the following procedure to prevent it
from dropping.
Charging the Battery
Charge using an AC adaptor (optional/commercially available) and a USB
connection cable (commercially available).
1
Set the camera on/off switch to [OFF].
2
Insert the battery into the camera.
3
Connect the camera USB port and the AC adaptor using the
USB connection cable.
4
Connect the AC adaptor to an electrical outlet.
0The charging light turns red and charging begins.
The charging light turns off when charging is complete.
(A) To the AC adaptor
0Using either the camera body and the optional AC Adaptor (DMW-AC11) or the camera body
and the supplied accessories of the optional Battery Charger (DMW-BTC15).
0The supplied charger can also be used to charge instead of the camera body.
Inserting Cards (Optional)
You can use CFexpress cards and SD memory cards with this camera.
(A) Card slot 1: CFexpress card
(B) Card slot 2: SD card
0
Match the orientation of the cards as shown in the figure and then insert them firmly until they click.
0To remove a card, confirm that the corresponding card access light has turned off, push the
card until it clicks, then pull the card out straight.
0Format the cards with the camera before use.
[ ] [ ] Select [Card Format]
Owner’s Manual <Complete Guide>
Refer to “Owner’s Manual <Complete Guide>” (HTML format/
PDF format) for details about how to use the camera and
notes on use.
https://panasonic.jp/support/dsc/oi/S1M2ES/index.html
WARNING:
To reduce the risk of fire, electric shock or product damage,
0
0
0
00
Do not expose this unit to rain, moisture, dripping or splashing.
0
0
0
00 Use the recommended accessories.
0
0
0
00 Do not remove covers.
0
0
0
00 Do not repair this unit by yourself. Refer servicing to qualified service personnel.
Product Location
Digital camera Bottom
Battery charger Bottom
If you have any questions, visit:
Canada : www.panasonic.ca/english/support
© Panasonic Entertainment & Communication Co., Ltd. 2025
Printed in China
PP
Panasonic Canada Inc.
5770 Ambler Drive, Mississauga, Ontario L4W 2T3
www.panasonic.com
Date of Purchase
Dealer Purchased From
Dealer Address
Dealer Phone No.
Model No.
Serial No.
How to Display Certification and Compliance Information
Certification and compliance information for this camera can be viewed on the menu
screen.
1Select the [Others] tab of the [Setup] menu.
2Select [Approved Regulations] and confirm your selection.
Contains IC : 772C-LBEE5ZZ1PJ
This device contains licence-exempt transmitter(s)/receiver(s) that comply with Innovation,
Science and Economic Development Canada’s licence-exempt RSS(s). Operation is
subject to the following two conditions:
(1) This device may not cause interference.
(2) This device must accept any interference, including interference that may cause
undesired operation of the device.
5150-5350 MHz band is restricted to indoor operations only.
The available scientific evidence does not show that any health problems are associated
with using low power wireless devices. There is no proof, however, that these low power
wireless devices are absolutely safe. Low power Wireless devices emit low levels of radio
frequency energy (RF) in the microwave range while being used. Whereas high levels of
RF can produce health effects (by heating tissue), exposure of low-level RF that does not
produce heating effects causes no known adverse health effects. Many studies of
low-level RF exposures have not found any biological effects. Some studies have
suggested that some biological effects might occur, but such findings have not been
confirmed by additional research. DC-S1M2ES (HMN is 1PJ2305) has been tested and
found to comply with ISED radiation exposure limits set forth for an uncontrolled
environment and meets RSS-102 of the ISED radio frequency (RF) Exposure rules.
CAUTION
Battery pack (Lithium-ion battery pack)
0Use the specified unit to recharge the battery pack.
0Do not use the battery pack with equipment other than the specified unit.
0Do not get dirt, sand, liquids, or other foreign matter on the terminals.
0Do not touch the plug terminals (i j and ) with metal objects.
0Do not disassemble, remodel, heat or throw into fire.
If any electrolyte should come into contact with your hands or clothes, wash it off
thoroughly with water.
If any electrolyte should come into contact with your eyes, never rub the eyes. Rinse eyes
thoroughly with water, and then consult a doctor.
CAUTION
0
Danger of explosion if battery is incorrectly replaced. Replace only with the type
recommended by the manufacturer.
0When disposing of the batteries, please contact your local authorities or dealer and ask
for the correct method of disposal.
Warning
Risk of fire, explosion and burns. Do not disassemble, heat above 60 oC
(140 oF) or incinerate.
Battery pack
DMW-BLK22
Body cap
*1
1HE1MC891Z
Battery charger
DVLC1005Z
Hot shoe cover
*1
4HR1MC5229Z
Shoulder strap
DVPW1040Z
Cover for the battery grip connector
*1
SKF0145K
Interchangeable lens “LUMIX S 24-105mm F4 MACRO O.I.S.”
*2
S-R24105
Lens hood
1ZE4SR24105Z
Lens rear cap
*3
RGE1Z276Z
Lens cap
*3
1GE1Z276Z
(1) Camera on/off switch
(2) Mode dial
(3) Mode dial lock button
(4) Rear dial
(5) Charging light/Network connection light
(6) [ ] (Recording distance reference
mark)
(7) Video rec. button
(8) [WB] (White balance) button
[ISO] (ISO sensitivity) button
[ ] (Exposure compensation) button
(9) Front dial
(10) Shutter button
(11) AF-Point Scope button/Enlarged live
display (video) button
(12) Lens release button
(13) Lens lock pin (Lens fitting mark)
(14) Stereo microphone
(15) Diopter adjustment dial
(16) Hot shoe (hot shoe cover)
(17) [LVF] button
(18) Drive mode dial
(19) Drive mode dial lock button
(20) Shoulder strap eyelet
(21) Photo/video/S&Q switch
(22) Self-timer light/AF assist light
(23) Front tally lamp
(24) Sub video rec. button
(25) [MIC] socket
(26) Headphone socket
(27) USB port
(28) HDMI socket
(1)
(2)
(3)
(4)
(7)
(8)
(9)
(12)
(10)
(11)
(13)
(5)
(6)
(16)
(15)
(14)
(22)
(23)
(19)
(18)
(17)
(21)
(20)
(24)
(25)
(26)
(27)
(28)
(29) Eye sensor
(30) Viewfinder
(31) Operation lock lever
(32) [ ] (Playback) button
(33) Speaker
(34) [ ] (AF mode) button
(35) Monitor/Touch screen
(36) Battery grip connector (cover for the
battery grip connector)
(37) Focus mode lever
(38) Joystick
(39) [AF ON] button
(40) [Q] (Quick menu) button
(41) Rear tally lamp/Rear card access light
(42) Card door
(43) Card door lock lever
(44) Control dial ( )
Cursor buttons (3421)
[MENU/SET] button ( )
(45) [DISP.] button
(46) [ ] (Cancel) button/
[ ] (Delete) button
(47) DC coupler cover
(48) Battery door
(49) Battery door release lever
(50) [REMOTE] socket
(51) Card access light 2
(52) Card slot 2
(53) Card slot 1
(54) Card access light 1
(30)
(31)
(36)
(32)
(33)
(34)
(35)
(37) (39) (41)
(44)
(42)
(43)
(45)
(46)
(47)
(48)
(49)
(50)
(51)
(52)
(53)
(54)
(38) (40)
(29)
1
2
3
4
(A)
3
1
2
Charging time Approx. 170 min
Cautions
0
The battery that can be used with the camera is DMW-BLK22. (As of May 2025)
0
0
0
00 Always use genuine Panasonic batteries (DMW-BLK22).
0
0
0
00 If you use other batteries, we cannot guarantee the quality of this product.
0
0
0
00 It is recommended to use the Panasonic AC Adaptor (DMW-AC11: optional) or the
supplied accessories of the Panasonic Battery Charger (DMW-BTC15: optional) for
charging.
0You can charge with the camera body or the supplied charger using a commercially
available AC adaptor and a USB connection cable.
*Recommended specifications for the commercially available AC adaptor
– Supports PD (Power Delivery)
– Supports 9 V/3 A (27 W) DC output
– USB Type-C terminal
*Use a USB connection cable with 27 W output or better for charging.
0You can also use an AC adaptor with 5 V/500 mA or better for charging. However,
charging time may be longer than with the recommended AC adaptor.
0Operation is not guaranteed with all commercially available devices.
0Using charging methods other than those specified may result in fluid leakage,
overheating, combustion, rupturing, etc., and these may cause injury.
0This battery may present a risk of fire or chemical burn if mistreated.
0Place the removed battery in a plastic bag, and store or keep away from metallic objects
(clips, etc.).
0When disposing of the batteries, please contact your local authorities or dealer and ask
for the correct method of disposal.
0
0
0
00 For information on memory cards with confirmed operation, check the
following support site:
https://panasonic.jp/support/global/cs/dsc/connect/index.html
(English only)
CAUTION, HOT CARD
0
As indicated on the inside of the card door,
the card may be hot just after the camera
has been used. Be careful when removing.
When a warning of high temperature
is indicated on the screen, do not take
the card out immediately, but rather
wait for the temperature to drop and
the indication to disappear.
(C) CAUTION, HOT CARD
1
2
3
(B)
(A)
(C)
DVQX2780ZA
F0325TN0
Owner’s Manual
<Quick Start Guide>
Digital Camera
DC-S1M2ES
Problemløsning Panasonic Lumix S1 II E
Hvis du har læst manualen omhyggeligt, men ikke fundet en løsning på dit problem, bed andre brugere om hjælp
Specifikationer
| Mærke: | Panasonic |
| Kategori: | fotokamera |
| Model: | Lumix S1 II E |