Hikvision
Ikke kategoriseret
DS-PWA32-HGR
Hikvision DS-PWA32-HGR Brugsanvisning
Her er Hikvision DS-PWA32-HGR (Ikke kategoriseret) brugervejledning. 4 sider på sprog Engelsk med en vægt på 0.6 Mb. Hvis du ikke kan finde svar på dit problem Spørg vores community.
Side 1/4
DS-PWA32-HR
Wireless Security Control Panel UD11744B
Diagram References
E N G L I S H
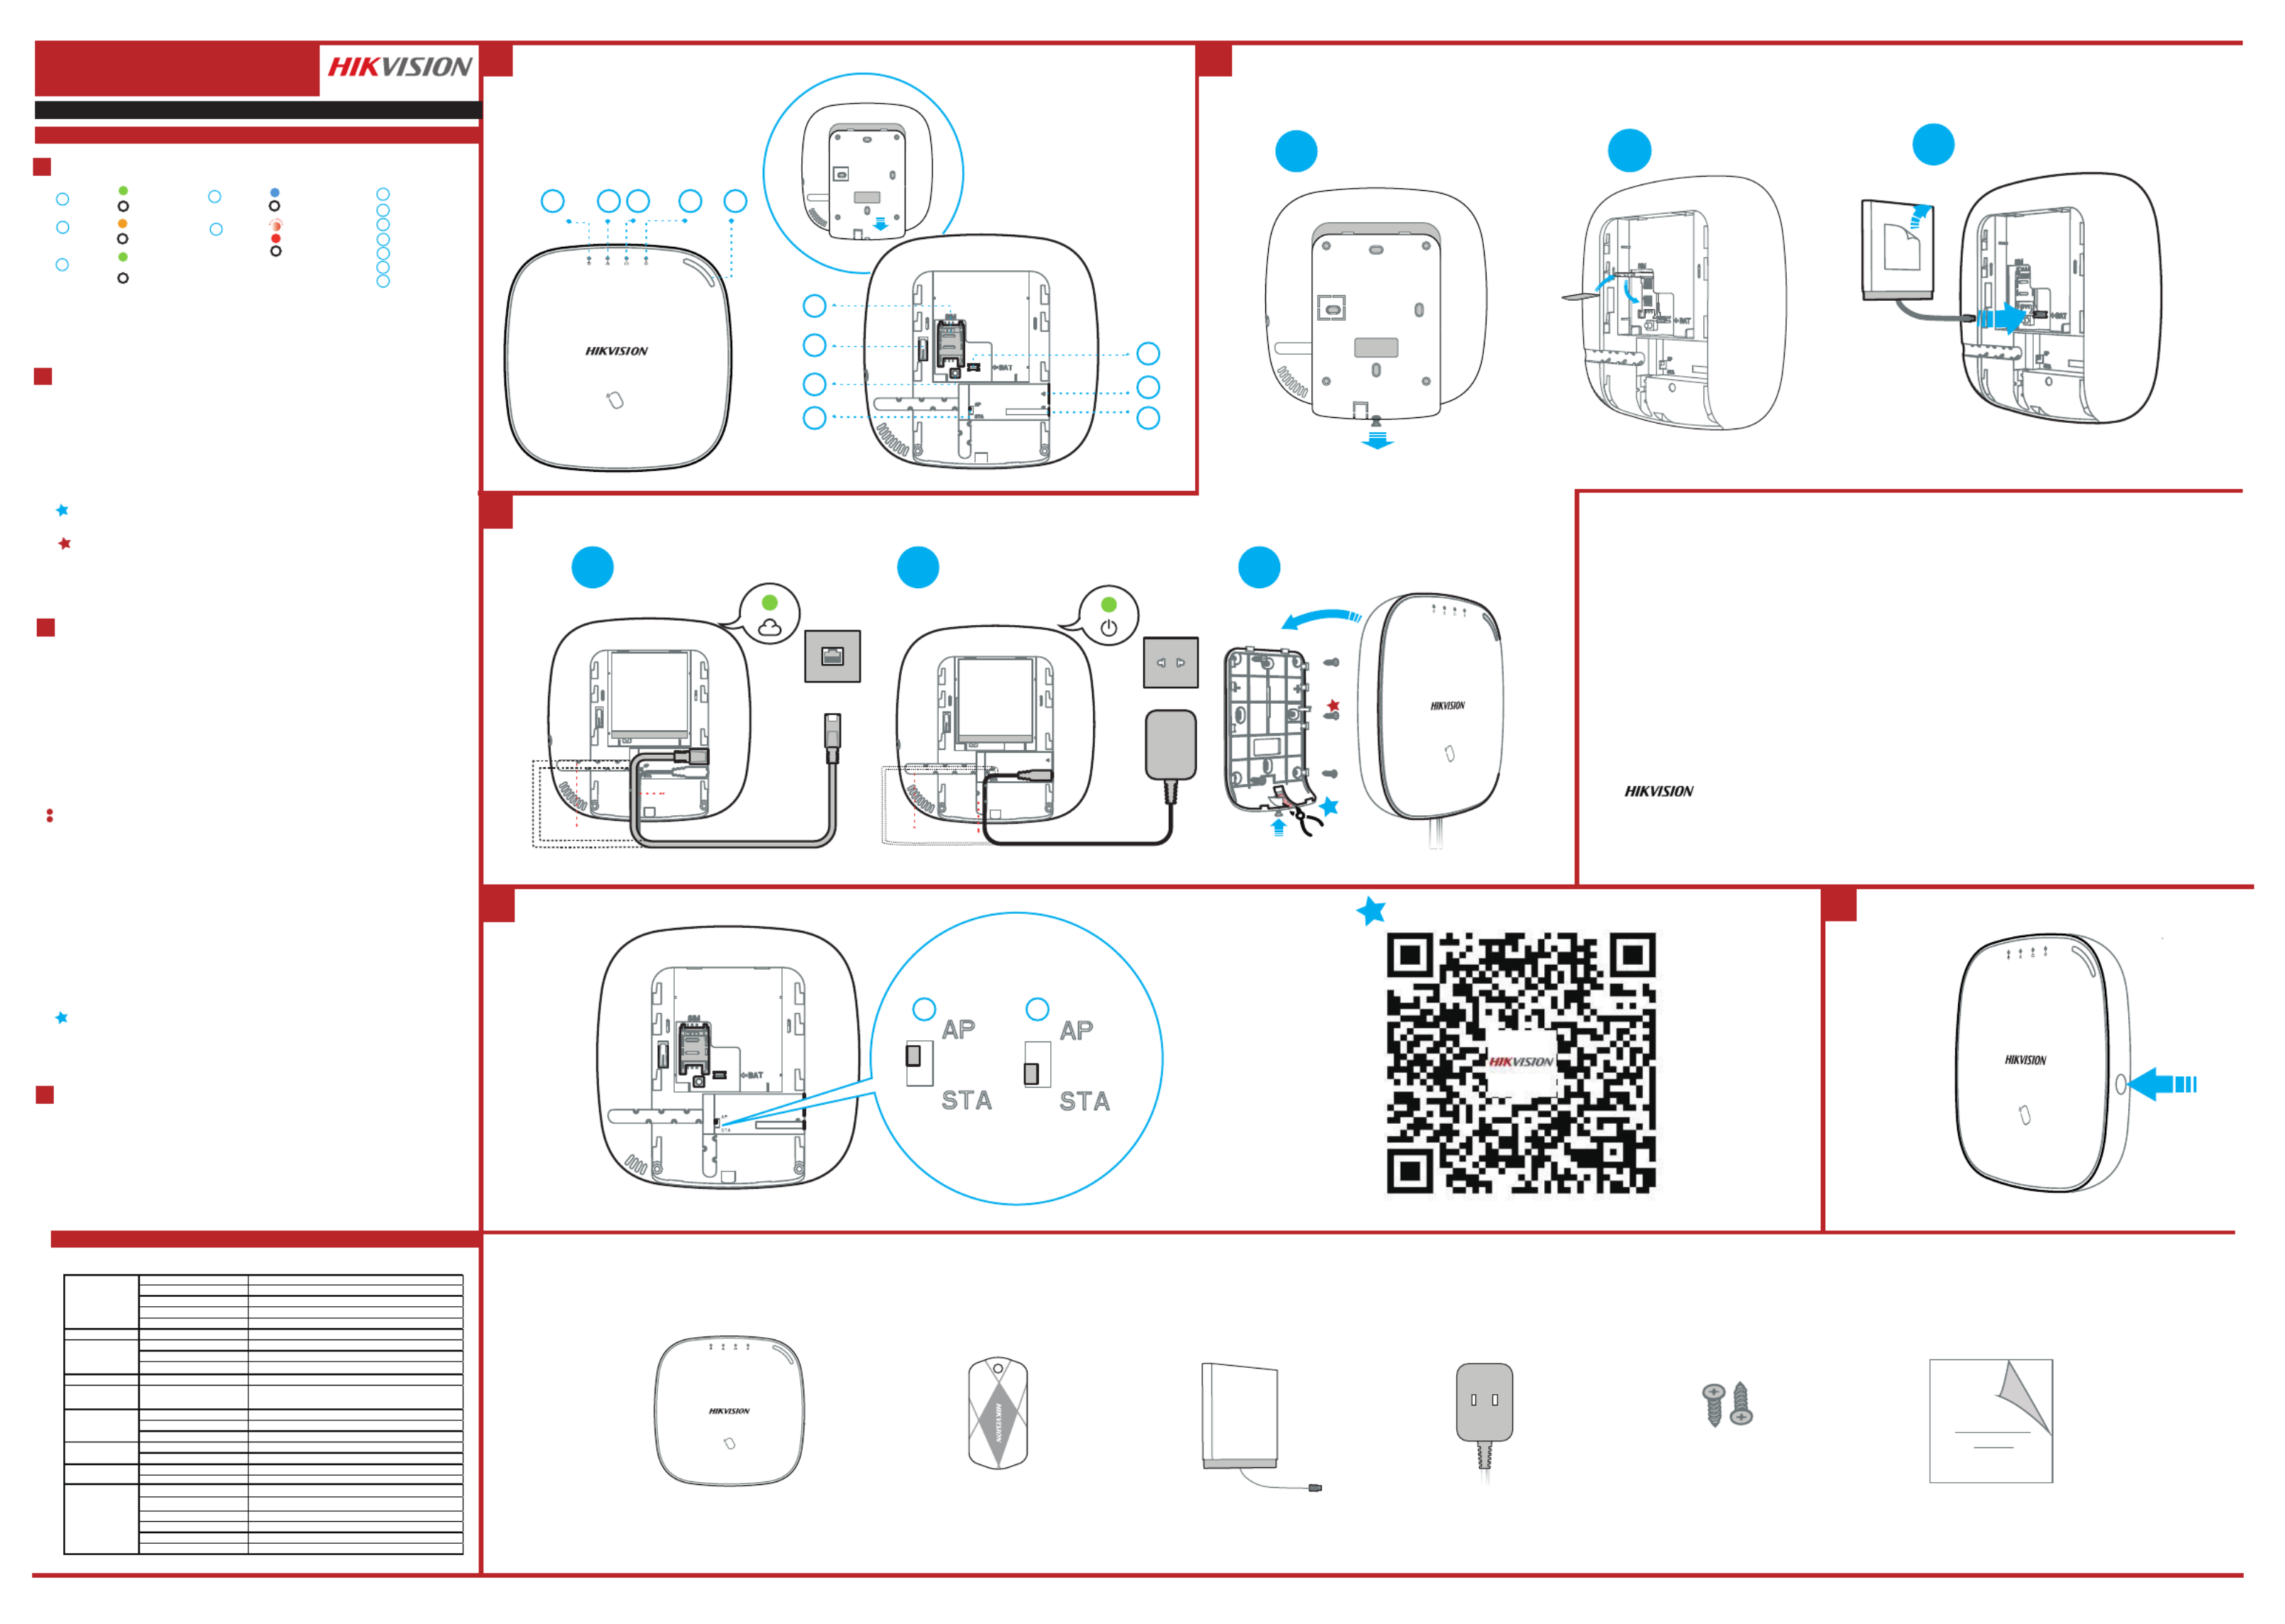
Control Panel x 1 Power Adapter x 1 Screw x 4IC Card in Special Shapes x 5 Quick Start Guide x1Baery x 1
Components
Appearance
Installaon
Set up via APP
Log Into the Web Client
Set Up
1
2
3
Set up via Web Client
AC Power Power On
System Fault
No Fault
Panel is added to
Hik-connect account
Panel is not added to
Hik-connect account
Armed
Disarmed
Alarm Occurred
Device Tampered
No Alarm
Power Off
Fault
Link
Arm
/Disarm
Alarm
Note: Remove the rear cover, and some of the components and interfaces are on the rear panel.
21
22
23
25
24
1. Loosen the screw on the rear cover. Slide down the rear cover and remove it from the
control panel.
2. Insert a SIM card into the SIM card slot.
3. Connect the baery to the control panel.
4. Connect the power adapter to the control panel and a power outlet. The power indicator
turns green about 30s later, which means that the device is powered on.
Note: The condion of no SIM card, no baery, AC power off, or network disconnected, will cause Control Panel Fault.
5. Connect the Ethernet cable to an internet outlet. While the device is added to a Hik-Connect
account, the link indicator turns green.
6. Secure the rear cover in the installaon posion with the supplied screws. Aach the
control panel on the rear cover, and ghten the rear cover screw to complete the installaon.
Side Opening
If you need to route the cable though the boon of the panel, remove the sheet of the side
opening.
1. Log into the App Store or Google Play and input Hik-Connect to search and install the
mobile client.
2. Log into the APP with Hi-Connect account.
3. Tap Add Device. Scan the device QR code on the rear panel(on the lable).
4. Tap Connect to a Network. Select Wireless Connecon (AP) as the connecon mode.
5. Push the AP/STA mode switch to the AP posion, tab Confirm.
6. Tap Connect to Wi-Fi on the promt-up window. Select and connect to a stable Wi-Fi , and
click Next.
7. Create a password to acvate the device.
8. Push the AP/STA mode switch to the STA posion.
Note: You need to enter the Verificaon Code (on the device lable which is pasted on the rear panel) before
acvaon if you add the device by entering the device serial No.(SN).
SIM Card Slot
Baery Connector
Network Interface
Power Interface
Reset Buon
AP&STA Switch
Tamper Spring
212
211
210
29
28
2
7
26
Note: The funcon of GPRS or 3/4G(implemented with build-in SIM card slot) depends on the model of the device.
TAMPER Screw
It is compulsory to secure the TAMPER screw.
Specification
Alarm Input 32
Alarm Output 32
Siren 2
Keyfob 8
Par on 1
Interac onAudio Output 1, 1.5W
RF Frequency 868MHz
RF Modula on 2GFSK
RF Distance 800m Open Area( )
Wired Network Ethernet 10M/100M Self-adap ve
Cellular Network GPRS, 3/4G
S
upports report push-no ca on to ARC & Cloud, text fi
n
o ca on via SMS, and audio no ca on via phone callfi fi
Standard 802.11b/g/n
Encryp on Supported
Channel 2.4G
Applica on iVMS-4200, and mobile APP
Protocol SIA - Contact ID
IC Card 12
User 13 (1 Installer, 1 Administrator, and 11 General User)
Power
5 VDC 10W,
Consump on (without HDD) <5.6W
Opera on Temperature –10 to 55℃ ℃
Opera on Humidity 10% to 90%
Shell Material PC+ABS
Dimension(WxHxD) 155 x155x35mm
Wireless Device
Connec on
Applica on &
Protocol
User
RF
Others
Wi-Fi
Add Peripheral Device
While the control panel is not in the configuraon mode, press the funcon buon on the
side of the control panel once and trigger a peripheral device.
Check RF Signal
While the control panel is not in the configuraon mode, double press the funcon buon,
and you can check the RF signal strength on the peripheral device .
Set up via 4200 Client
Add a Camera for the Zone
Configure Video-Push
1. Download and install the iVMS-4200 client.
Note: Get the client soware from the official website:www.hikvision.com.
2. Enter Device Management page, select the device in the Online Device List, click Edit
Network Sengs, change the port as 80, and click Add to Client.
Note: You should acvate the device for the first usage.
1. Click System-Network Camera, and you can add two cameras for the control panel.
2. Click Wireless Device-Zone, select a zone, click the Sengs icon, and select a camera to link
with the zone.
You can also link a camera with the zone via APP, refer to the Wireless Security Control Panel
User Manual for details.
Funcon Buon Operaon
Input the device IP address in the address bar of the web browser. Create a password to
acvate the device and log into the web client.
Default IP Address when using mobile broswer in the AP mode:192.168.8.1. The device must be in the AP mode.
Default IP Address when connecing the network cable with computer directly :192.0.0.64
Note: Keyfobs cannot be added by funcon buon operaon.
You can view the alarm video via APP and email. For detailed sengs, refer to Security
Control Panel User Manual.
4
For mul-language switch , refer to Security Control Panel User Manual (scan the QR code) for details.
Note: Add card or keyfob via the web client before adding peripheral device for clearing tampering alarm.
3
2
1
23
2 4 2
52
6
Tear off
Cable Pipe
Cable Pipe
Cable Pipe Cable Pipe
2
21
21
22232425
4
COPYRIGHT ©2018 Hangzhou Hikvision Digital Technology Co., Ltd.
ALL RIGHTS RESERVED.
Any and all informaon, including, among others, wordings, pictures, graphs are the properes of Hangzhou Hikvision Digital
Technology Co., Ltd. or its subsidiaries (hereinaer referred to be “Hikvision”). This user manual (hereinaer referred to be “the
Manual”) cannot be reproduced, changed, translated, or distributed, parally or wholly, by any means, without the prior wrien
permission of Hikvision. Unless otherwise spulated, Hikvision does not make any warranes, guarantees or representaons,
express or implied, regarding to the Manual.
About this Manual
This Manual is applicable to the Axiom Security Control Panel Kit.
The Manual includes instrucons for using and managing the product. Pictures, charts, images and all other informaon hereinaer
are for descripon and explanaon only. The informaon contained in the Manual is subject to change, without noce, due to
firmware updates or other reasons. Please find the latest version in the company website (hp://overseas.hikvision.com/en/).
Please use this user manual under the guidance of professionals.
Trademarks Acknowledgement and other Hikvision’s trademarks and logos are the properes of Hikvision in
various jurisdicons. Other trademarks and logos menoned below are the properes of their respecve owners.
Product Informaon
26
27
28
29
210
211
212
2
2
222
7
Problemløsning Hikvision DS-PWA32-HGR
Hvis du har læst manualen omhyggeligt, men ikke fundet en løsning på dit problem, bed andre brugere om hjælp
Specifikationer
| Bredde: | 155 mm |
| Dybde: | 35 mm |
| Højde: | 155 mm |
| Produktfarve: | Sort |
| Batterispænding: | 3.8 V |
| Batterikapacitet: | 4520 mAh |
| Datanetværk: | GPRS |
| Batteriteknologi: | Lithium-Ion (Li-Ion) |
| Relativ luftfugtighed ved drift (H-H): | 10 - 90 % |
| Ethernet LAN: | Ja |
| Driftstemperatur (T-T): | -10 - 55 °C |
| Ethernet LAN-datahastigheder: | 10,100 Mbit/s |
| Husmateriale: | Acrylonitrilbutadienstyren |
| LED-indikatorer: | Ja |
| Strømkilde type: | Battery,DC |
| Indgangsspænding: | 5 V |
| RF-transmissionsfrekvens: | 868 Mhz |
| Mængde af sammenkoblede alarmer (maks): | 32 |
| RF-transmissionsområde: | 800 m |
| Grænsefladetype: | LAN, Wi-Fi, GPRS |
| Indbygget batteri: | Ja |
| Backup strøm: | Ja |